https://brew.sh


Homebrew

The Missing Package Manager for macOS (or Linux).

brew.sh

Homebrew란? 

  • Homebrew란 Ruby로 개발된 MacOS용 패키지 관리 애플리케이션(패키지 매니저)이다.
  • 즉, 터미널에 명령어를 입력하는 것으로 프로그램의 설치, 삭제, 업데이트를 관리할 수 있도록 한다. 
  • 기존의 방법: 사이트 방문 -> 설치 파일 다운 -> 설치 파일 실행 -> 설치
  • Ubuntu의 apt-get, CentOS의 yum과 같은 역할을 수행한다. 

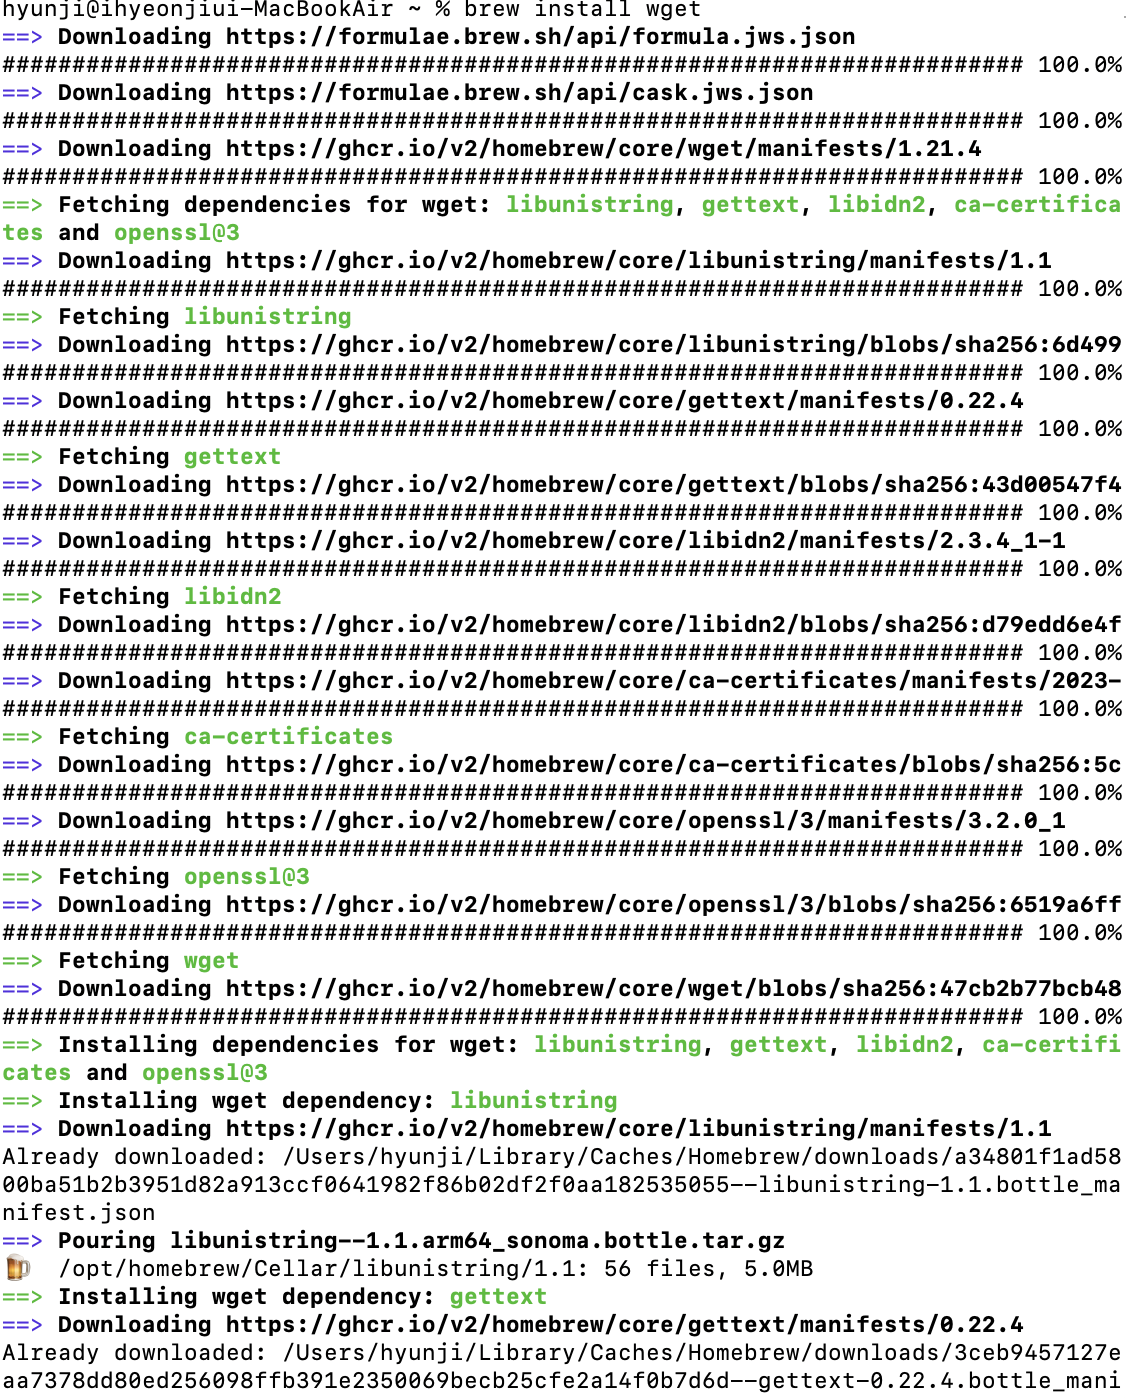
Homebrew 설치

  • 사이트의 가이드를 따르면 된다. 

  • 터미널에 해당 명령어를 입력한 후, 맥 패스워드를 입력한다. 
  • 엔터키 클릭
  • brew -v로 설치 확인
  • 완료

Homebrew 주요 명령어

🍅패키지 설치: brew install {패키지명}

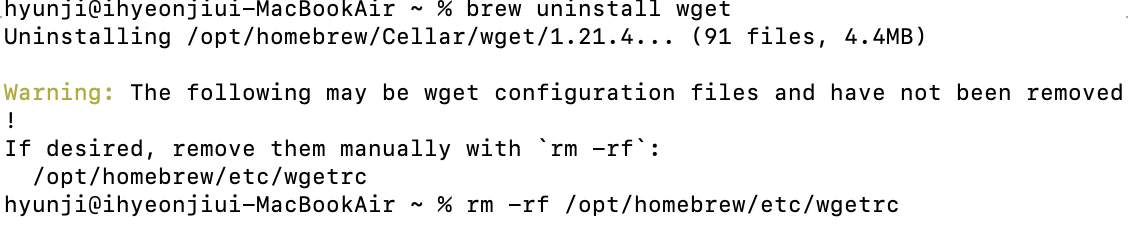
  • 패키지 제거: brew uninstall {패키지명}

  • 모든 패키지 업그레이드: brew upgrade
  • 패키지 업그레이드: brew upgrade {패키지명}
  • 설치된 패키지 업그레이드 여부 확인: brew outdated
  • 설치된 패키지 확인: brew list
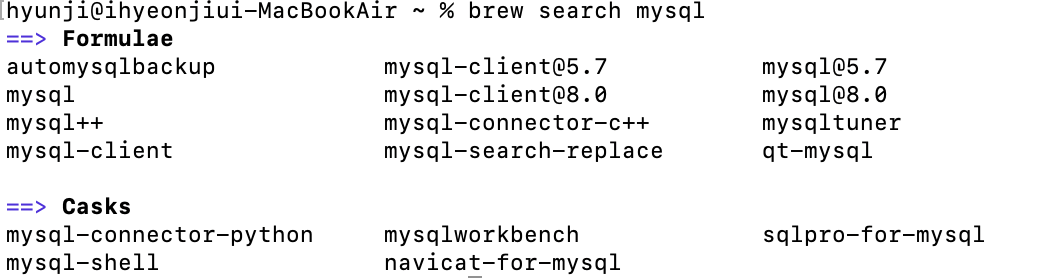
  • 패키지 검색: brew search {패키지명}

나머지는 필요할때 찾아보자

특이점

  • Homebrew는 오픈 소스 기반 패키지 매니저이다. 
  • Homebrew를 설치해도 Homebrew를 이용해 설치한 프로그램들은 여전히 존재한다. 

Cask란?

  • Homebrew를 이용하여 GUI기반 어플리케이션을 설치하기 위한 유틸리티


Cask 설치

  • 위에서 설치한 brew를 이용해서 설치 가능한다. 
brew install cask


Cask 사용

  • brew [명령어] 사이에 cask만 추가해주면 된다. 
  • 예시) brew cask install {패키지이름}

정환님의 인프런 [한입 크기로 잘라 먹는 리액트(React.js) : 기초부터 실전까지]강좌를 참고하여 작성하였습니다. 

https://www.inflearn.com/course/%ED%95%9C%EC%9E%85-%EB%A6%AC%EC%95%A1%ED%8A%B8#


한입 크기로 잘라 먹는 리액트(React.js) : 기초부터 실전까지 - 인프런 | 강의

개념부터 독특한 프로젝트까지 함께 다뤄보며 자바스크립트와 리액트를 이 강의로 한 번에 끝내요. 학습은 짧게, 응용은 길게 17시간 분량의 All-in-one 강의!, 리액트, 한 강의로 끝장낼 수 있어요.

www.inflearn.com


Why React?

🍅첫 번째 이유 - 컴포넌트 기반 제작

  • 만약, 모든 요소가 다 같지만 딱 한 섹션만 서로 다른 페이지 100개가 있을 경우, 페이지들을 대조했을때 중복되는 코드가 너무 많다. 
  • 중복된 부분 중 수정해야 할 부분이 생긴다면 우리는 100개의 페이지를 전부 수정해야 하는 문제 발생 -1
    • -> Shotgun Surgery🧨(산탄총 수술)이라고 한다.
  • 컴포넌트화 : 다른 페이지에서도 공통적으로 같이 사용해야 하는 요소들을 컴포넌트로 만어 사용하는 방식. 
    • 공통으로 사용되는 요소에 수정 사항이나 문제가 발생했을 때 수정이 훨씬 수월해지고 쉬워진다. 
    • = 유지보수가 쉬워진다.
  • 리액트는 컴포넌트 기반의 UI 라이브러리
    • html 요소들을 컴포넌트화 해서 재사용할 수 있는 기술이 있다. 

🍅두 번째 이유 - 선언형 프로그래밍

명령형 프로그래밍
(절차를 하나하나 다 나열 해야함)
선언형 프로그래밍
(그냥 목적을 바로 말함)
1. 결과를 표시할 요소를 가져온다. 
(id=result)

2. 현재 결과값을 10진수 기준, 숫자형으로 변환해서 가져와 current라는 상수에 저장한다. 

3. Current상수테 저장된 값을 결과를 표시할 요소의 값에 plus라면
+1 해서 넣고, minus라면 -1해서 넣는다. 
1. Plus를 누르면 result값에 +1 한다. 
Minus를 눌렀다면 반대로 한다. 
  • 명령형 프로그래밍 방식에는 jQuery가 있고, 선언형 프로그래밍 방식에는 React.js가 있다. 

🍅세 번째 이유 - Virtual DOM

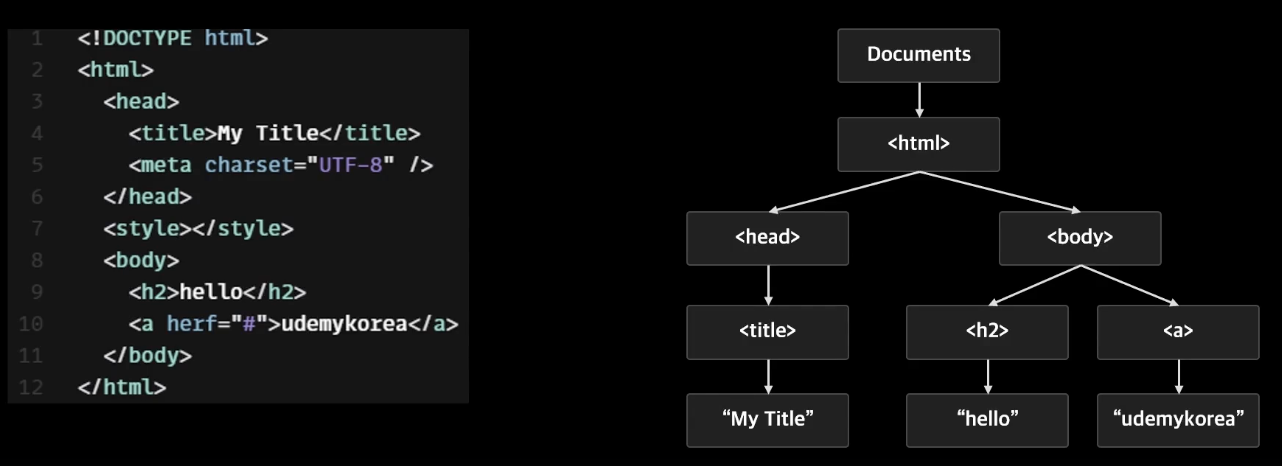
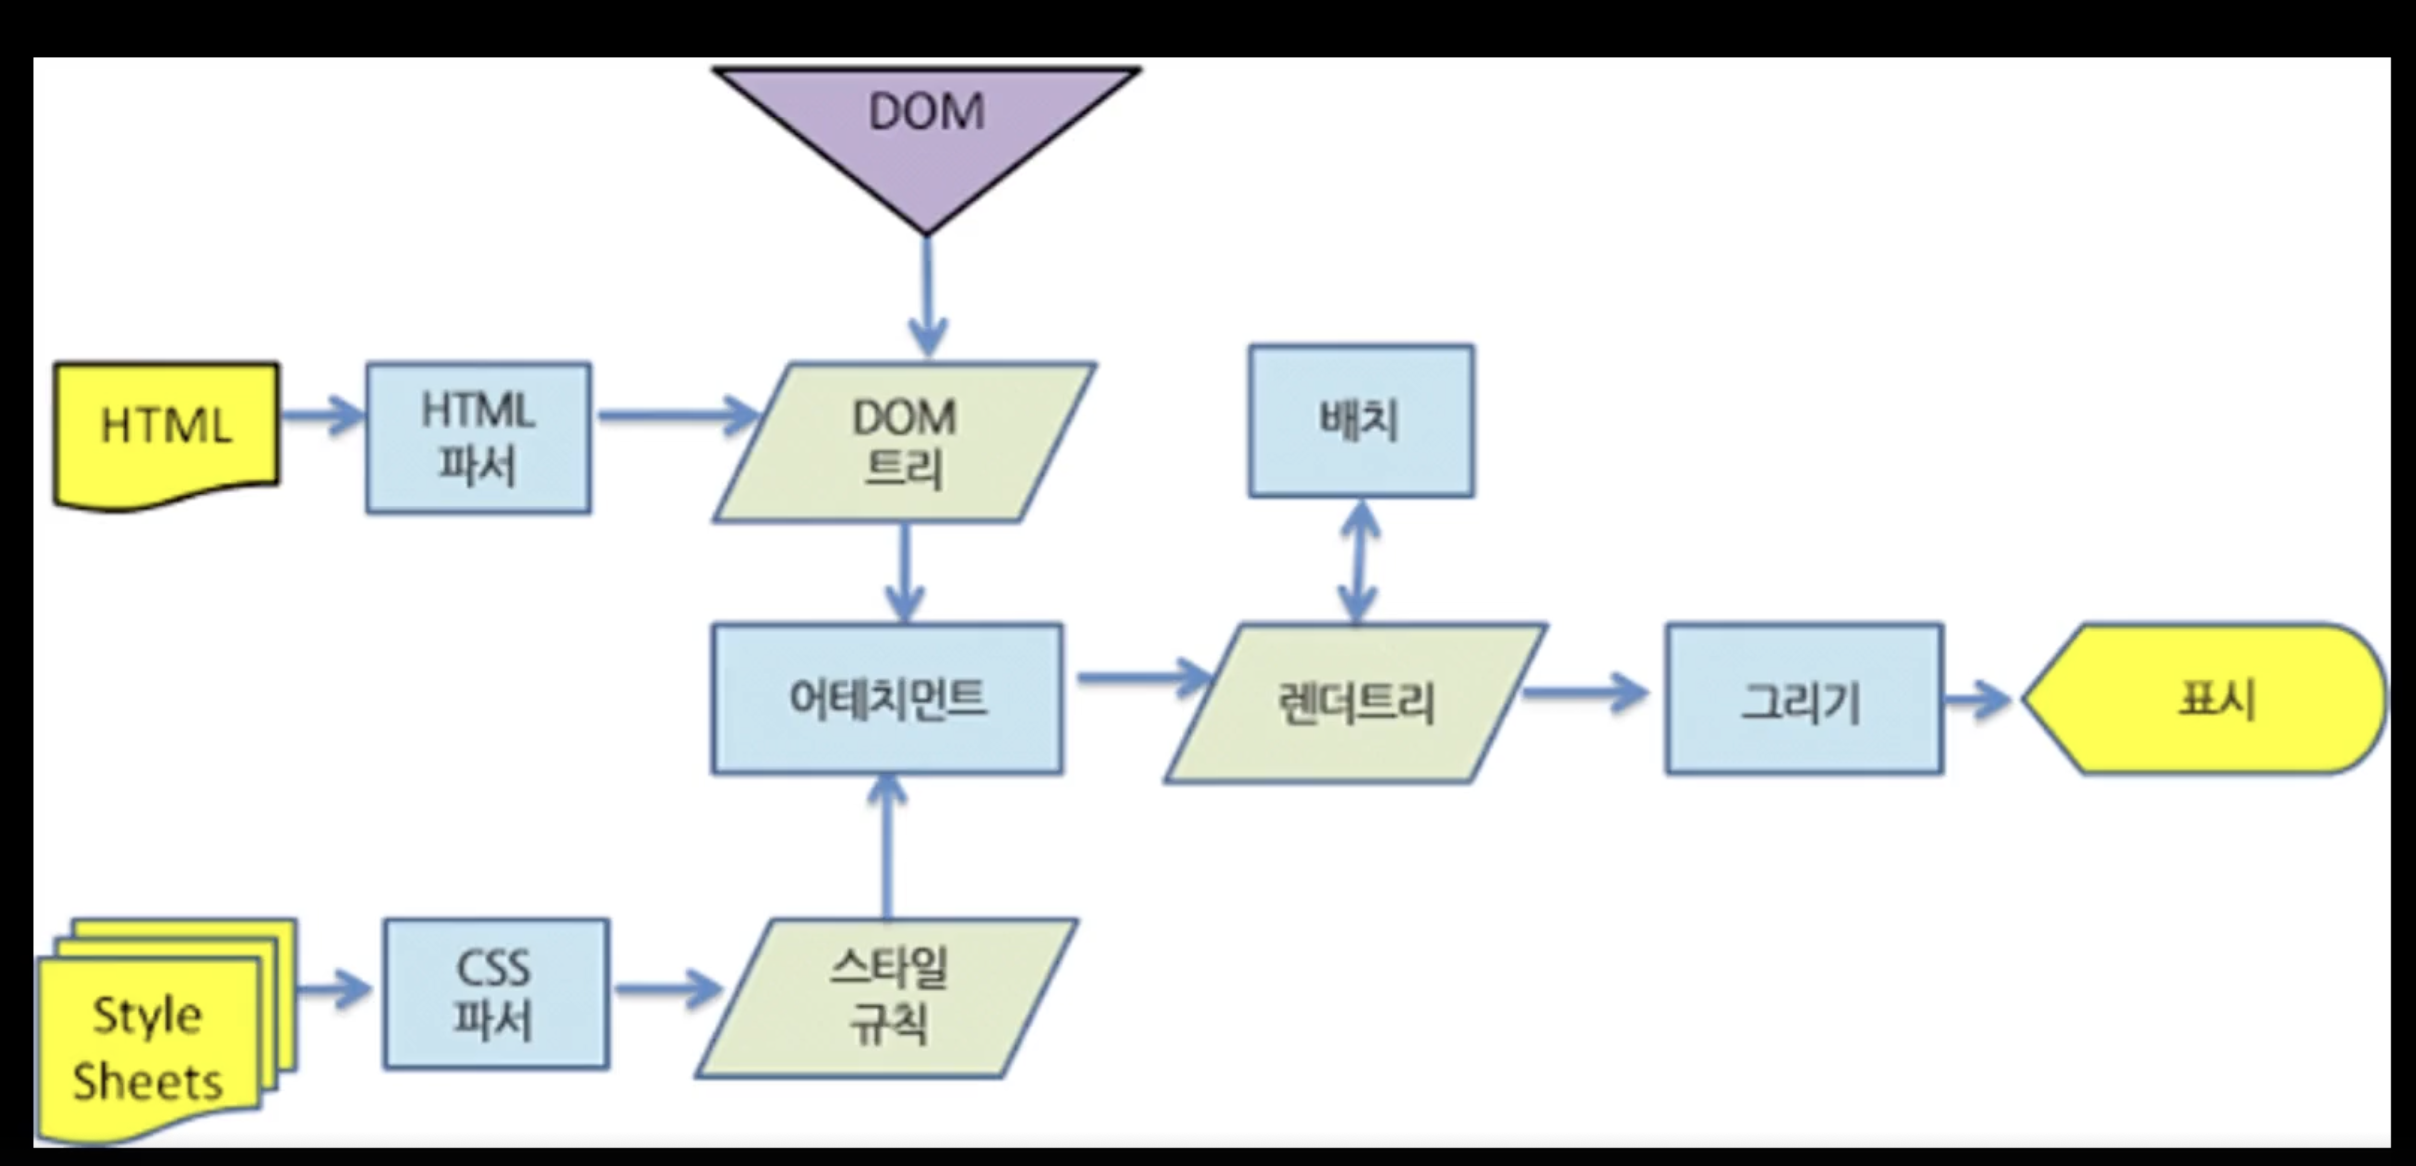
  • DOM(document object model): 문서 객체 모델

  • HTML을 트리 형태로 변환시켜 놓은 객체

  • 변환된 DOM은 이런 흐름에 따라 눈에 보이게 된다. 
  • 이런식으로 브라우저가 많은 일을 수행하기 때문에 노드의 수가 많아질수록, 변경이 잦아질수록 성능 저하로 이어질 수 있다.

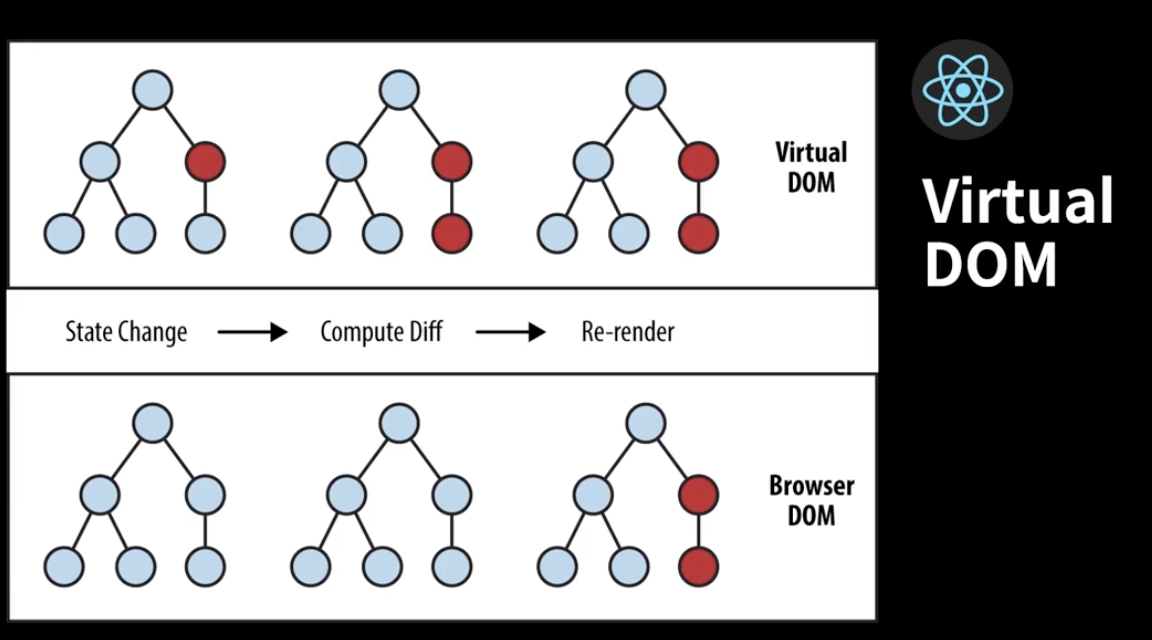
  • Virtual DOM이란 실제 DOM에서 처리하는 방식이 아닌 Virtual DOM과 메모리에서 미리 처리하고 저장한 후, 실제 DOM과 동기화하는 프로그래밍 개념이다. 
  • 5번 업데이트 할 것을 한번만 업데이트 한다 정도의 개념. 

Create React App

🍅프로젝트 생성

  • npx create-react-app [프로젝트 이름] 명령어를 이용해서 리액트 프로젝트를 생성한다. 
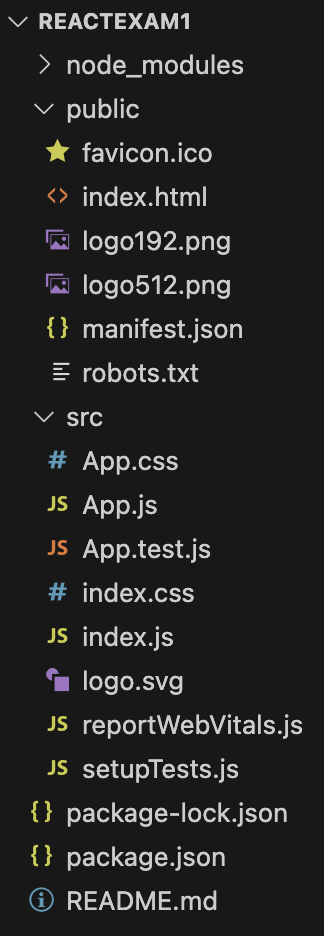
  • 프로젝트 구조는 다음과 같다. 

🍅프로젝트 실행

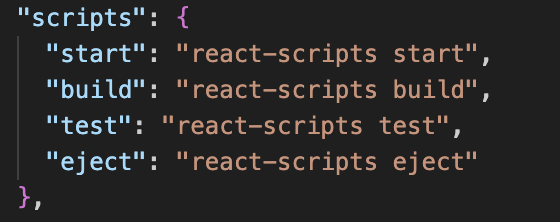
  • pakage.json을 확인해보면 긴 문자열 명령을 별명을 붙여서 부를 수 있는 기능인 scripts가 있다.

  • npm start 명령어를 입력하면 프로젝트가 실행된다. 
  • 프로그램을 종료하고 싶다면 터미널에 ctrl(^)+c를 입력한다. 

🍅src > App.js

//App.js

import logo from './logo.svg';
import './App.css';

function App() {
  return (
    <div className="App">
      <header className="App-header">
        <img src={logo} className="App-logo" alt="logo" />
        <p>
          Edit <code>src/App.js</code> and save to reload.
        </p>
        <a
          className="App-link"
          href="https://reactjs.org"
          target="_blank"
          rel="noopener noreferrer"
        >
          Learn React
        </a>
      </header>
    </div>
  );
}

export default App;
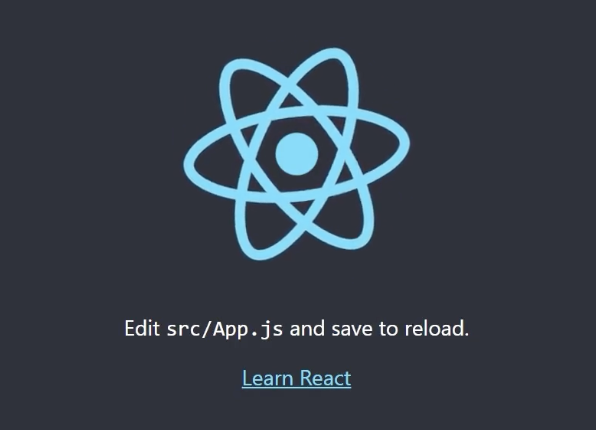
  • App.js의 초기 상태.
import logo from './logo.svg';
import './App.css';

function App() {
  return (
    <div className="App">
      <header className="App-header">
        <h2>Hello World</h2>
      </header>
    </div>
  );
}

export default App;

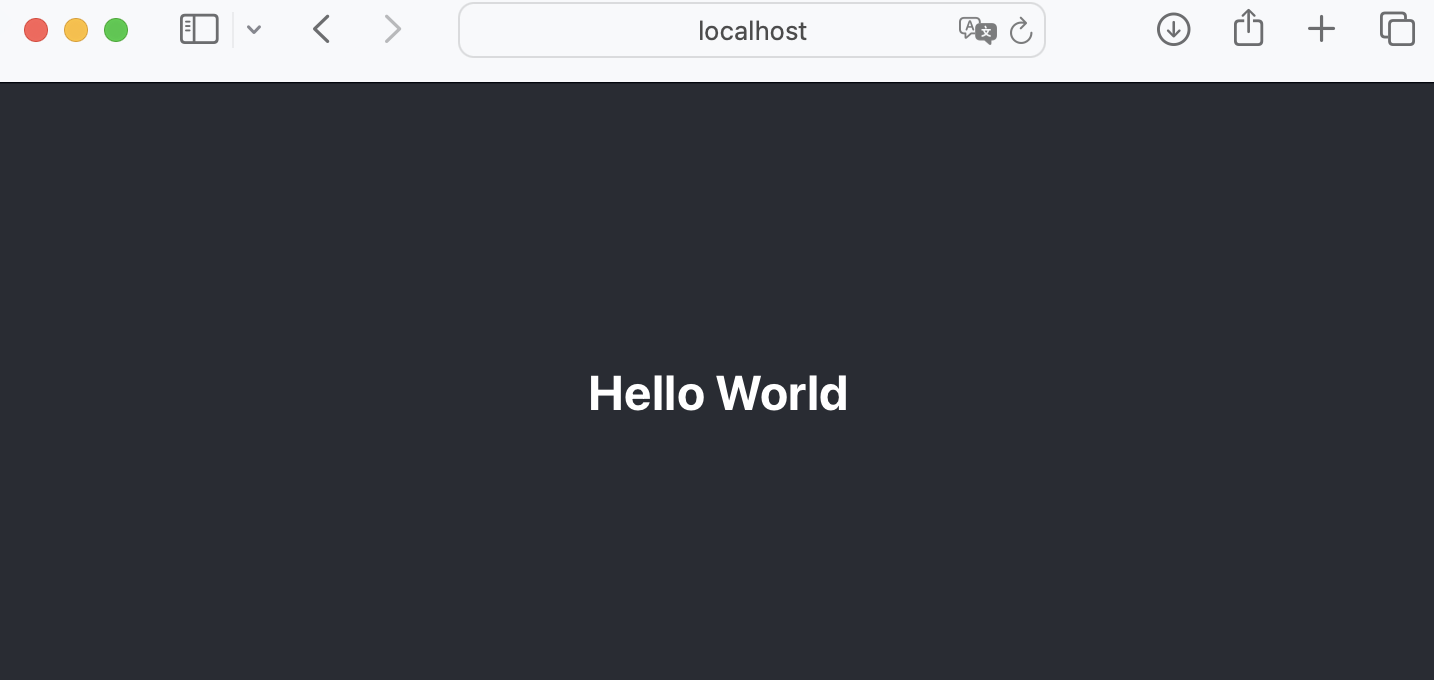
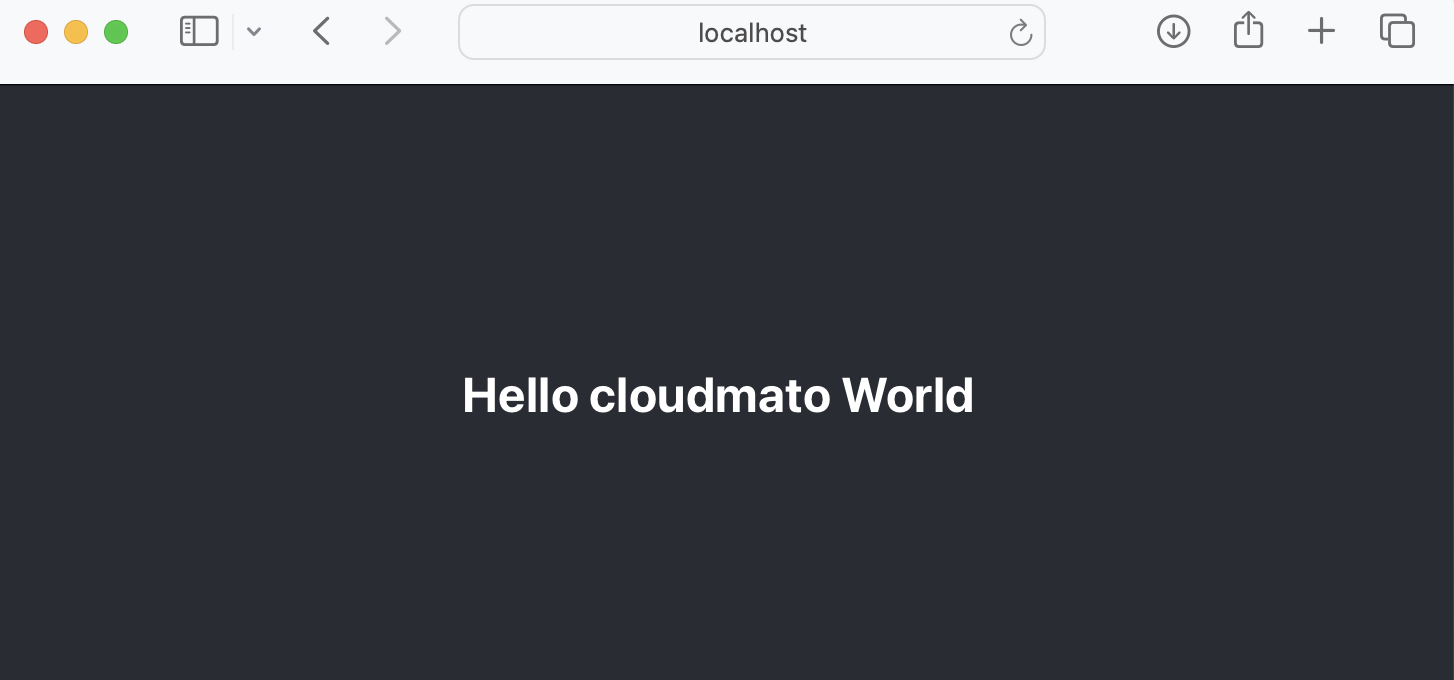
  • App.js의 header안의 내용을 지우고 h2태그를 추가했더니 화면이 다음과 같이 바꼈다. 

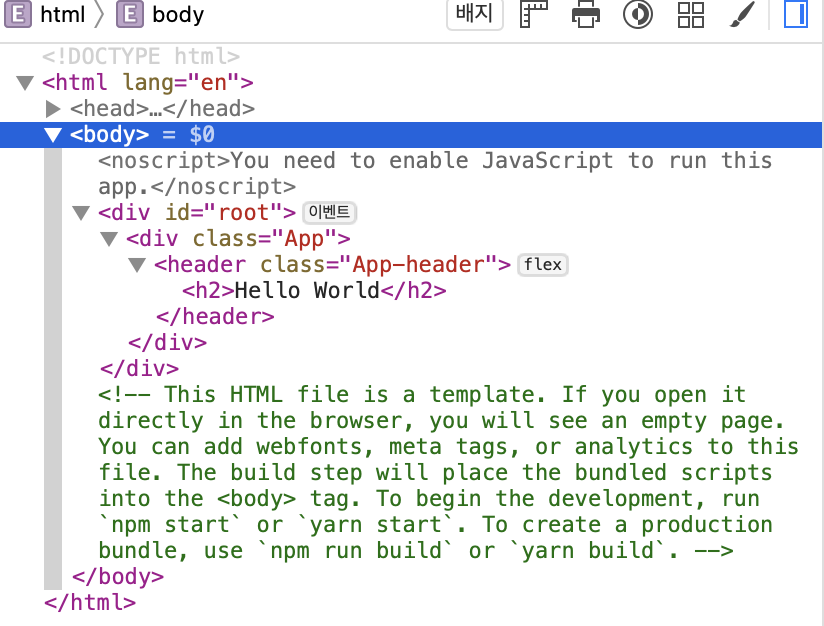
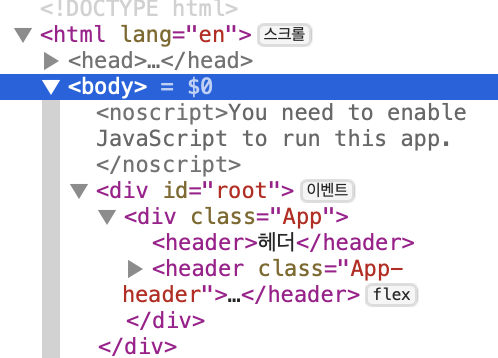
  • 개발자 도구로 확인본 결과는 다음과 같다. 
  • 결론적으로 App.js 파일에 있는 App()이라는 함수가 리턴하는 html들이 id가 root인 div 아래로 자식 요소로 들어갔다고 유추가 가능하다. 

🍅src > index.js

//index.js

import React from 'react';
import ReactDOM from 'react-dom/client';
import './index.css';
import App from './App';
import reportWebVitals from './reportWebVitals';

const root = ReactDOM.createRoot(document.getElementById('root'));
root.render(
  <React.StrictMode>
    <App />
  </React.StrictMode>
);

// If you want to start measuring performance in your app, pass a function
// to log results (for example: reportWebVitals(console.log))
// or send to an analytics endpoint. Learn more: https://bit.ly/CRA-vitals
reportWebVitals();
  • index.js의 초기 상태이다. 
  • 확인해 볼 수 있는 것 
    • root.render이라고 해서 root를 화면에 그리고 있다. 
    • React.StricMode태그 안에 <App />이라고 되어 있는데 상단의 import로 App을 불러와서 사용하고 있는 것이다. 
    • ** 강의에선 React.render으로 되어있지만 강의 수강 기준 현재는 createRoot를 이용하는 방법을 사용한다. 
  • 즉 아까 봤던 App.js에 있던 App()함수가 return하는 값이 id가 root인 div아래로 들어가게 된다. 

🍅public > index.html

<!-- index.html-->

<!DOCTYPE html>
<html lang="en">
  <head>
    <meta charset="utf-8" />
    <link rel="icon" href="%PUBLIC_URL%/favicon.ico" />
    <meta name="viewport" content="width=device-width, initial-scale=1" />
    <meta name="theme-color" content="#000000" />
    <meta
      name="description"
      content="Web site created using create-react-app"
    />
    <link rel="apple-touch-icon" href="%PUBLIC_URL%/logo192.png" />
    <!--
      manifest.json provides metadata used when your web app is installed on a
      user's mobile device or desktop. See https://developers.google.com/web/fundamentals/web-app-manifest/
    -->
    <link rel="manifest" href="%PUBLIC_URL%/manifest.json" />
    <!--
      Notice the use of %PUBLIC_URL% in the tags above.
      It will be replaced with the URL of the `public` folder during the build.
      Only files inside the `public` folder can be referenced from the HTML.

      Unlike "/favicon.ico" or "favicon.ico", "%PUBLIC_URL%/favicon.ico" will
      work correctly both with client-side routing and a non-root public URL.
      Learn how to configure a non-root public URL by running `npm run build`.
    -->
    <title>React App</title>
  </head>
  <body>
    <noscript>You need to enable JavaScript to run this app.</noscript>
    <div id="root"></div>
    <!--
      This HTML file is a template.
      If you open it directly in the browser, you will see an empty page.

      You can add webfonts, meta tags, or analytics to this file.
      The build step will place the bundled scripts into the <body> tag.

      To begin the development, run `npm start` or `yarn start`.
      To create a production bundle, use `npm run build` or `yarn build`.
    -->
  </body>
</html>
  • 그렇다면 id가 root인 div는 어디에 위치할까?
  • 바로 public안에 있는 index.html안에 있다. 
  • 💡정리:
    • 리액트 앱이 실행이 되면 src밑에 index.js가 실행이 되면서 index.html안에 있는 id가 root인 div아래로 app.js 안에 있는 App()함수의 리턴값이 들어가게 되는 것. 

📁node_modules

일부 모듈만 캡쳐.

  • src, public 외의 또 다른 패키지. 
  • node.js 패키지의 구성 요소 중 하나로 외부 모듈을 저장하고 있는 폴더. 
  • 상당히 많은 모듈들을 가지고 있기 때문에 하나하나 설치할 수 없기에 create-react-app을 이용하여 한번에 설치를 했다. 
  • 사이즈가 상당히 크기 때문에 배포나 전송시 많은 시간이 소요될 수 있다. 
  • node-modules는 삭제해도 문제가 없다. 왜냐하면 pakage.json에 필요한 모듈이 명시가 되어있으며,  npm i (npm install)를 이용하여 설치할 수 있기 때문이다. 

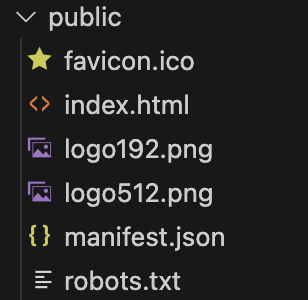
📁public

  • favicon.ico : 웹사이트의 아이콘
  • index.html : 위에서 확인
  • logo192.png, logo512.png, manifest.jspn : 해당 강의에서 사용하지 않을 파일.
  • robots.txt : 구글이나 네이버가 웹사이트를 수집할 때, 수집이 가능/불가능한 경로를 명시하는 파일.

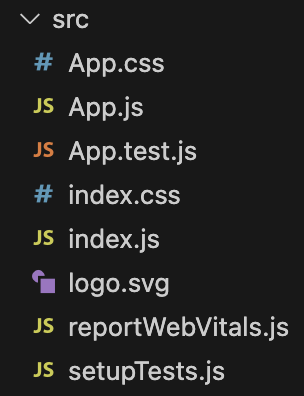
📁src

  • App.css : 스타일파일
  • App.js : 위에서 확인
  • App.test.js : 테스트를 위한 파일. 해당 강의에선 사용x
  • index.css : 스타일 파일
  • index.js : 위에서 확인
  • logo.svg : 해당 강의에선 사용x
  • reportWebVitals.js : 해당 강의에선 사용x
  • setupTests.js : 해당 강의에선 사용x

🍅JSX

//App.js

import './App.css';

function App() {
  let name = "cloudmato";
  return (
    <div className="App">
      <header className="App-header">
        <h2>Hello {name} World</h2>
      </header>
    </div>
  );
}

export default App;

  • app.js파일로 돌아가서 App함수 밑에 지역변수인 name을 선언해주고 중괄호{ }를 사용해서 <h2>안에 넣어주면 화면에 반영이 된다.
  • JSX :  javascript형식과 html형식을 합쳐서 사용할 수 있는 Javascript의 확장 문법 
  • React는 이렇게 App()이라는 함수를 만들고 return으로 JSX 문법의 html을 리턴해주면서 컴포넌트를 만든다. 

🍅 export default App;

  • common.js 모듈 시스템에서는 module.exports를 이용해서 모듈을 내보냈었다. 
  • ES 모듈 시스템에서는 export default 를 이용해서 모듈을 내보내게 된다. 
  • 내보낸 모듈은 다른 파일에서 import [이름] from [경로] 이런 식으로 사용하게 된다. 
    • [이름]은 다른 이름으로 변경이 가능하다. 

JSX

🍅컴포넌트 만들기 - header역할을 할 컴포넌트

  • src 디렉토리 아래 myheader.js 파일 생성
//myHeader.js

const MyHeader = () => {};

export default MyHeader;
//App.js

import './App.css';

import MyHeader from './MyHeader';

function App() {
  let name = "cloudmato";
  return (
    <div className="App">
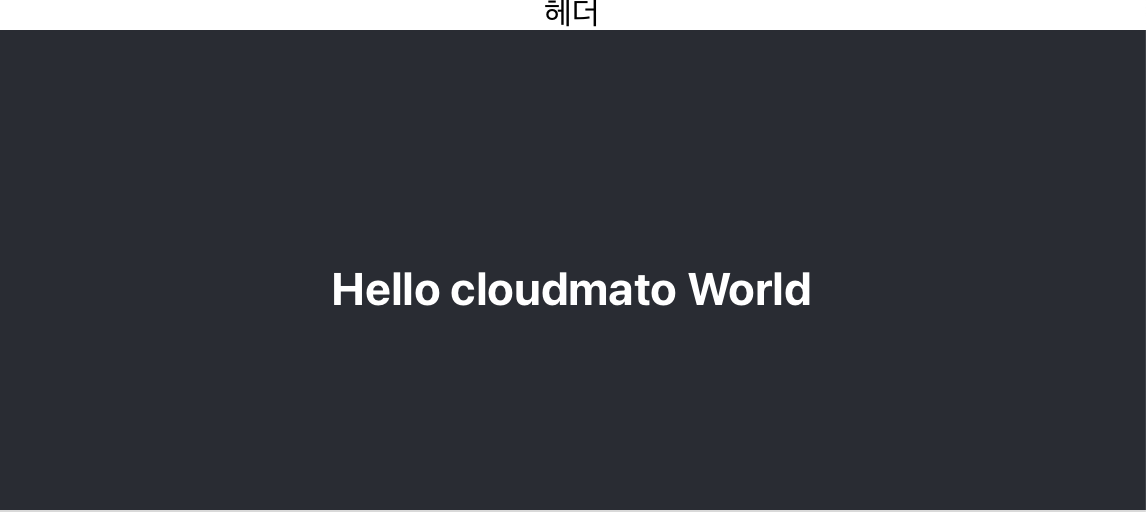
      <MyHeader />
      <header className="App-header">
        <h2>Hello {name} World</h2>
      </header>
    </div>
  );
}

export default App;

  •  화살표함수로 MyHeader를 만든 후에 export default로 내보낸 후 App.js에 불러와주었다. 
//Myfooter.js

const MyFooter = () => {
    return <footer>MyFooter</footer>;
};

export default MyFooter;
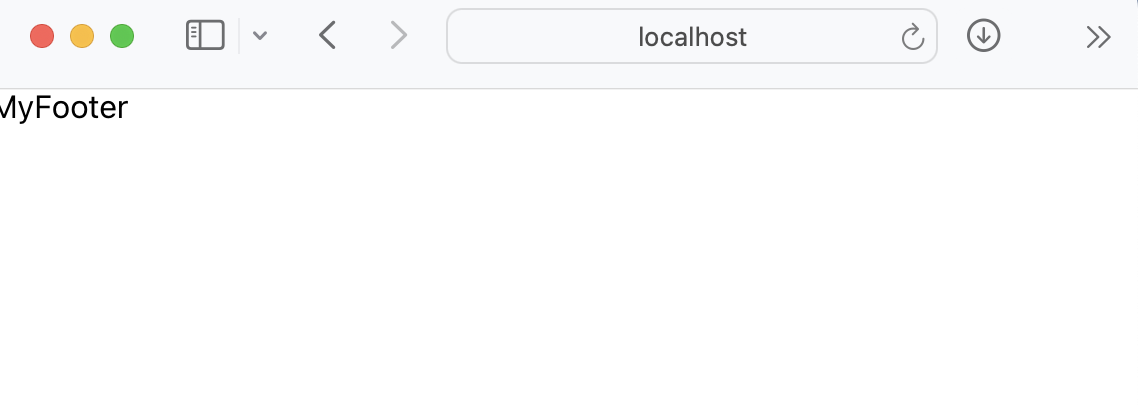
  • Myfooter.js 파일을 생성한 후 export default를 이용해 내보내 주었다. 
//index.js

import React from 'react';
import ReactDOM from 'react-dom/client';
import './index.css';
import App from './App';
import MyFooter from './MyFooter';

const root = ReactDOM.createRoot(document.getElementById('root'));
root.render(
  <React.StrictMode>
    <MyFooter />
  </React.StrictMode>
);

// If you want to start measuring performance in your app, pass a function
// to log results (for example: reportWebVitals(console.log))
// or send to an analytics endpoint. Learn more: https://bit.ly/CRA-vitals

  • index.js 에 <MyFooter />를 넣어주면 MyFooter가 렌더링 된다. 
  • 즉, index.js에서는 최상위 컴포넌트를 정의해줄 수 있다. 

🍅JSX 문법 - 1. 닫힘규칙

  • 예를 들어 <div></div> 등과 같이 닫힘 태그를 꼭 써주어야 한다. 
  • <br>, <hr> 같은 경우 <br /><hr /> 등과 같이 self-closing해주어야 한다. 

🍅JSX 문법 - 2. 최상위 태그 규칙

  • JSX로 컴포넌트를 만들어서 리턴하려면 반드시 하나의 최상위 태그로 다른 모든 태그들을 감싸주어야 한다. 
  • 최상위 태그: 가장 바깥에 있는 태그
//App.js

import './App.css';
import React from 'react';

import MyHeader from './MyHeader';

function App() {
  let name = "cloudmato";
  return (
    <React.Fragment>
      <MyHeader />
      <header className="App-header">
        <h2>Hello {name} World</h2>
      </header>
      </React.Fragment>
  );
}

export default App;
  • 만약 최상위 태그로 묶고 싶지 않다면 react.fragment라는 기능을 사용해주면 된다. 
//App.js

import './App.css';

import MyHeader from './MyHeader';

function App() {
  let name = "cloudmato";
  return (
    <>
      <MyHeader />
      <header className="App-header">
        <h2>Hello {name} World</h2>
      </header>
      </>
  );
}

export default App;
  • 이런 식으로 빈 태그를 만들어 줘도 된다. 

🍅JSX문법과 CSS 결합하기 - 1. css파일 이용하기

//App.js

import './App.css';

import MyHeader from './MyHeader';

function App() {
  let name = "cloudmato";
  return (
    <div className="App">
      <MyHeader />
      <h2>Hello {name} World</h2>
      <b id='boldText'>react.js</b>
    </div>
  );
}

export default App;
  • import를 이용하여 css파일을 불러와 사용할 수 있다. 
  • jsx문법에서는 <div className="App">처럼 className 속성을 사용해주어야 한다. 
/* App.css */

.App {
  text-align: center;
  background-color: orangered;
}


h2 {
  color: white;
}

#boldText {
  color: green;
}

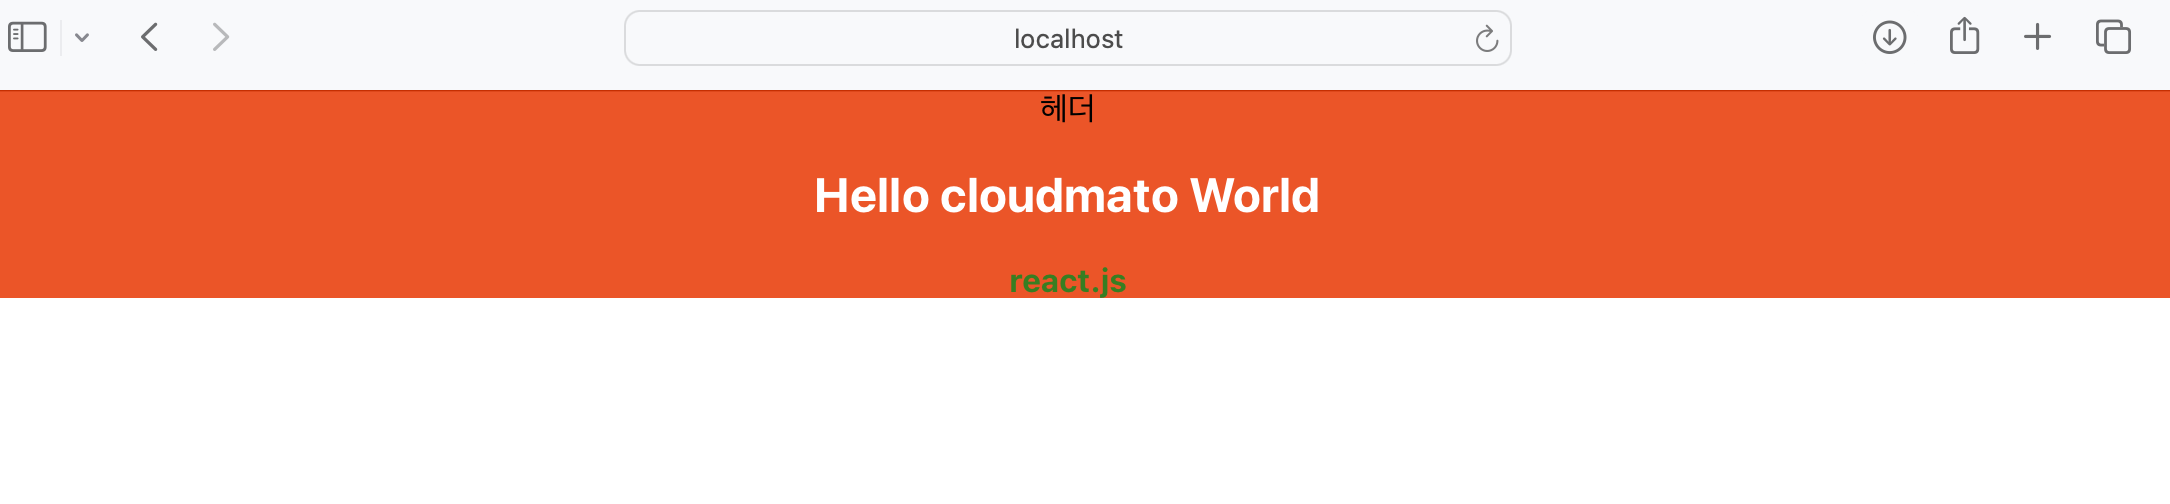
  • 클래스, 태그, 아이디 수준의 css가 변경된 것을 확인할 수 있다. 

🍅JSX문법과 CSS 결합하기 - 1. 인라인 스타일링 방식 이용하기

//App.js

// import './App.css';

import MyHeader from './MyHeader';

function App() {
  let name = "cloudmato";

  const style = {
    App : {
      backgroundColor : "red",
    },
    h2 : {
      color: "black",
    },
    bold_text: {
      color: "green",
    },
  };

  return (
    <div className="App" style={style.App}>
      <MyHeader />
      <h2 style={style.h2}>Hello {name} World</h2>
      <b id='boldText' style={style.bold_text}>react.js</b>
    </div>
  );
}

export default App;

  • 스타일 객체를 만들어서 태그 안에 style 속성으로 넣어줘 스타일을 적용시킬 수 있다. 

🍅JSX의 JavaScript값 사용하기

  const func = () => {
    return 'func';
  }

  return (
    <div className="App" style={style.App}>
      <MyHeader />
      <h2 style={style.h2}>{func()} {name} {1+2}</h2>
      <b id='boldText' style={style.bold_text}>react.js</b>
    </div>
  );

  • { } 중괄호를 이용해서 함수, 변수, 계산식 등 문자열을 표현될 수 있다. 
  const number = 5;

  return (
    <div className="App" style={style.App}>
      <MyHeader />
      <h2 style={style.h2}>{func()} {name} {1+2}</h2>
      <b id='boldText' style={style.bold_text}>{number}는 {number % 2 === 0 ? "짝수" : "홀수"}</b>
    </div>
  );
}

  • 다음과 같이 조건부 렌더링도 가능하다. 

State(상태)

  • 계속해서 변화하는 특정 상태
  • 상태에 따라 각각 다른 동작을 함

  • React에서 말하는 상태, 즉 state는 컴포넌트가 갖는 계속 값이 바뀔 동적인 데이터. 
  • 이 상태를 바꾸는 관리는 컴포넌트가 하게 된다. 

🍅Counter 예제

// Counter.js

const Counter = () => {
    return (
        <div>
            <h2>0</h2>
            <button>+</button>
            <button>-</button>
        </div>
    )
}

export default Counter;
//App.js

import Counter from './Counter';
import MyHeader from './MyHeader';

function App() {
  return (
  <div>
    <MyHeader />
    <Counter />
  </div>
  );
}

export default App;

  • Counter.js파일을 만들어주고 App.js에 불러와 준 화면이다. 
  • 현재는 버튼을 눌러도 아무런 변화가 일어나지 않는다. 
// Counter.js

import React, {useState} from "react";  //state는 react의 기능이기 때문에 React를 import해야한다. 


const Counter = () => {

    const [count, setCount] = useState(0);

    const onIncrease = () => {
        setCount(count + 1);
    };
    
    const onDecrease = () => {
        setCount(count - 1);
    };


    return (
        <div>
            <h2>{count}</h2>
            <button onClick={onIncrease}>+</button>
            <button onClick={onDecrease}>-</button>
        </div>
    )
}

export default Counter;

동영상 서비스가 종료되어 해당 콘텐츠를 재생할 수 없습니다.

  • 버튼을 누를 때(=count state가 변경될 때)마다 숫자가 변경되는 것을 확인할 수 있다. 
  • rerender : 컴포넌트는 자신이 가진 state, 상태가 변화하면 화면을 다시 그린다. 
    • 즉, 함수가 다시 호출 된다. 
  • 여러개의 state를 하나의 컴포넌트가 가져도 된다. 

Props

  • 컴포넌트에 데이터를 전달하는 방법

🍅실습

// Counter.js

import React, {useState} from "react";  //state는 react의 기능이기 때문에 React를 import해야한다. 


const Counter = () => {

    const [count, setCount] = useState(0);

    const onIncrease = () => {
        setCount(count + 1);
    };
    
    const onDecrease = () => {
        setCount(count - 1);
    };


    return (
        <div>
            <h2>{count}</h2>
            <button onClick={onIncrease}>+</button>
            <button onClick={onDecrease}>-</button>
        </div>
    )
}

export default Counter;
  • 이전 영상에서 만든 count.js 파일이다. 
//App.js

import Counter from './Counter';
import MyHeader from './MyHeader';

function App() {
  return (
  <div>
    <MyHeader />
    <Counter initialValue = {5}/>
  </div>
  );
}

export default App;
  • 여기서 Counter 컴포넌트는 App컴포넌트의 자식 요소로 배치되어 있다. 
  • 이때 App컴포넌트가 전달한 값을 Counter의 초기값으로 사용하려면 어떻게 해야 할까?
  • initailValue 속성을 이용한다. 다만, 이렇게 값을 준다고 바로 적용되진 않는다. 
// Counter.js

import React, {useState} from "react";  //state는 react의 기능이기 때문에 React를 import해야한다. 


const Counter = (props) => {
    console.log(props);

    const [count, setCount] = useState(0);

    const onIncrease = () => {
        setCount(count + 1);
    };
    
    const onDecrease = () => {
        setCount(count - 1);
    };


    return (
        <div>
            <h2>{count}</h2>
            <button onClick={onIncrease}>+</button>
            <button onClick={onDecrease}>-</button>
        </div>
    )
}

export default Counter;

  • props로 값을 받아오고 콘솔을 찍어보면 객체 안에 initialValue가 담겨서 온다. 
    <Counter a = {1} b = {2} initialValue = {5}/>

  • 이런 식으로 여러개의 prop을 전달해도 전부 객체에 담겨서 전달된다. 
  • 하지만 이렇게 전달하게 되면 굉장히 길어지기 때문에 불편하다. 
//App.js

import Counter from './Counter';
import MyHeader from './MyHeader';

function App() {

  const counterProps = {
    a : 1,
    b : 2,
    initialValue : 5
  };

  return (
  <div>
    <MyHeader />
    <Counter {...counterProps}/>
  </div>
  );
}

export default App;

  • 이렇게 객체에 담아서 스프레드 연산자(...)에 담아 전달을 하게 되도 이전 방법과 같이 객체에 담겨서 전달된다. 
// Counter.js

import React, {useState} from "react";  //state는 react의 기능이기 때문에 React를 import해야한다. 


const Counter = ({initialValue}) => {

    const [count, setCount] = useState(initialValue);

    const onIncrease = () => {
        setCount(count + 1);
    };
    
    const onDecrease = () => {
        setCount(count - 1);
    };


    return (
        <div>
            <h2>{count}</h2>
            <button onClick={onIncrease}>+</button>
            <button onClick={onDecrease}>-</button>
        </div>
    )
}

export default Counter;
  • 이런식으로 비구조적 할당을 해준다. 
// Counter.js

import React, {useState} from "react";  //state는 react의 기능이기 때문에 React를 import해야한다. 


const Counter = ({initialValue}) => {

    const [count, setCount] = useState(initialValue);

    const onIncrease = () => {
        setCount(count + 1);
    };
    
    const onDecrease = () => {
        setCount(count - 1);
    };


    return (
        <div>
            <h2>{count}</h2>
            <button onClick={onIncrease}>+</button>
            <button onClick={onDecrease}>-</button>
        </div>
    )
}

Counter.defaultProps = {
    initialValue: 0,
}

export default Counter;
  • defaultProps를 이용하여 기본값을 지정해 주었을 때, 필요한 정보가 유실되었어도 기본값을 할당해준다. 

🍅실습 - 홀/짝 판별

const OddEvenResult  = () => {
    return <></>
};

export default OddEvenResult;
  • 홀수를 판별해줄 컴포넌트를 다른 파일에 만들어준다. 
// Counter.js

import React, {useState} from "react";  //state는 react의 기능이기 때문에 React를 import해야한다. 
import OddEvenResult from "./OddEvenResult";


const Counter = ({initialValue}) => {

    const [count, setCount] = useState(initialValue);

    const onIncrease = () => {
        setCount(count + 1);
    };
    
    const onDecrease = () => {
        setCount(count - 1);
    };


    return (
        <div>
            <h2>{count}</h2>
            <button onClick={onIncrease}>+</button>
            <button onClick={onDecrease}>-</button>
            <OddEvenResult count = {count}/>
        </div>
    );
};

Counter.defaultProps = {
    initialValue: 1,
}

export default Counter;
  • 이때 판별할 수를 Counter에서 받아와야 하기 때문에 props전달을 위해 OddEvenResult를 Counter의 자식요소로 배치한 후, count값을 전달해준다. 
const OddEvenResult = ({count}) => {
    // console.log(count);
    console.log("RENDER!");

    return <>{count % 2 ===0 ? "짝수" : "홀수" }</>
};

export default OddEvenResult;
  • 받아온 count값으로 홀짝 여부를 반환해주는 컴포넌트이다. 

  • 이런 결과값이 나온다. 미관상의 이유로 더 수정해주도록 하자. 
const Container = ({children}) => {
    return (
    <div style={{ margin: 20, padding: 20, border: "1px solid gray"}}>
        {children}
    </div>
    );
};

export default Container;
  • Container 컴포넌트를 만들어주는데, 이때 children이라는 자식요소들을 props로 받아준다. 
//App.js

import Counter from './Counter';
import MyHeader from './MyHeader';
import Container from './Container';

function App() {

  const counterProps = {
    a : 1,
    b : 2,
    // initialValue : 5
  };

  return (
    <Container>
      <div>
        <MyHeader />
        <Counter {...counterProps}/>
      </div>
     </Container>
  );
}

export default App;
  • App.js에서 요소들을 Container으로 묶어주면 다음과 같은 결과물이 나온다. 

이정환님의 인프런 [한입 크기로 잘라 먹는 리액트(React.js) : 기초부터 실전까지]강좌를 참고하여 작성하였습니다. 

https://www.inflearn.com/course/%ED%95%9C%EC%9E%85-%EB%A6%AC%EC%95%A1%ED%8A%B8#


한입 크기로 잘라 먹는 리액트(React.js) : 기초부터 실전까지 - 인프런 | 강의

개념부터 독특한 프로젝트까지 함께 다뤄보며 자바스크립트와 리액트를 이 강의로 한 번에 끝내요. 학습은 짧게, 응용은 길게 17시간 분량의 All-in-one 강의!, 리액트, 한 강의로 끝장낼 수 있어요.

www.inflearn.com


Node.js란?

  • Node.js를 알아야 하는 까닭? -> React.js가 자바스크립트 라이브러리이기 때문
  • 자바스크립트는 자바스크립트 엔진 위에서 돌아가고 그 엔진은 브라우저에 내장되어 있다. 
  • 하지만 브라우저 안에만 사용하기엔 자바스크립트의 활용성이 제한됨
  • 크롬의 자바스크립트 엔진 v8을 독립시킨 결과물이 바로 Node.js이며 이것을 통해 자바스크립트를 브라우저가 아닌 어디에서든 사용할 수 있게 되었다. 
  • 즉, Node.js는 Javascript의 런타임, 실행환경이다. 
  • Node.js를 설치해두면 브라우저 없이도 JavaScript코드를 실행시킬 수 있게 되었다는 것
  • -> JavaScript의 한계 해결
  • -> JavaScript로 웹 서버 또한 만들 수 있게 되었다. 

🍅웹 서버란?

  • 클라이언트(브라우저)로부터 웹을 요청받으면 웹을 반환한다. 
  • 서버의 종류: 웹 서버, 미디어 서버 ,채팅 서버 등

Node.js & VsCode 설치하기


Node.js Hello World & Common JS

🍅파일 실행하기

//index.js

console.log("Hello Node.js");
  • 해당 파일을 실행시키기 위해 node index.js를 입력한다.
  • 결과: Hello Node.js
  • 이전엔 웹브라우저의 개발자도구에서 콘솔을 확인할 수 있었다면 이젠 node.js를 통해 컴퓨터에서 확인할 수 있다. 
//cal.js

const add = (a, b) => a + b;

console.log(add(1, 2));
  • 다른 파일도 마찬가지로 node cal.js라는 입력어로 실행할 수 있다. 

🍅모듈 내보내기

  • 모듈 : 어떤 기능을 담당하는 분리된 파일
//계산 기능을 하는 파일 calc.js

const add = (a, b) => a + b;
const sub = (a, b) => a - b;

module.exports = {
    moduleName: "cal module",
    add: add,
    sub: sub
};
//index.js

const calc = require("./calc");

console.log(calc);

/**결과
*{
*  moduleName: 'cal module',
*  add: [Function: add],
*  sub: [Function: sub]
*}
  • require과 module.exports는 node.js의 내장함수이기 때문에 vanilla.js에서는 이용이 제한된다. 
//index.js

const calc = require("./calc");

console.log(calc.add(1,2)); //3
console.log(calc.add(1,3)); //4
console.log(calc.add(1,5)); //6
  • 다음과 같이 module.exports로 내보낸 모듈을 다른 파일에서 require과 경로를 이용하여 사용할 수 있다. 

이정환님의 인프런 [한입 크기로 잘라 먹는 리액트(React.js) : 기초부터 실전까지]강좌를 참고하여 작성하였습니다. 

https://www.inflearn.com/course/%ED%95%9C%EC%9E%85-%EB%A6%AC%EC%95%A1%ED%8A%B8#


한입 크기로 잘라 먹는 리액트(React.js) : 기초부터 실전까지 - 인프런 | 강의

개념부터 독특한 프로젝트까지 함께 다뤄보며 자바스크립트와 리액트를 이 강의로 한 번에 끝내요. 학습은 짧게, 응용은 길게 17시간 분량의 All-in-one 강의!, 리액트, 한 강의로 끝장낼 수 있어요.

www.inflearn.com


Truthy & Falsy

truthy falsy
falsy값이 아닌 값들.  null
undefined
false
NaN
0
-0
0n
"" (비어있는 string 값, '' ``도 포함)
documant.all(Object)

삼항 연산자

🍅삼항 연산자

let a = 3;

//일반 조건문 이용
if(a >= 0) {
    console.log("양수");
} else {
    console.log("음수");
}

//삼항 연산자 이용
a >= 0 ? console.log("양수") : console.log("음수");
  • (조건식) ? (참일 때 수행할 식) : (거짓일 때 수행할 식)
const arr = [];

//일반 조건문 이용
if(arr.length === 0) {
    console.log("빈 배열");
} else {
    console.log("안 빈 배열");
}

//삼항 연산자 이용
arr.length === 0 ? console.log("빈 배열") : console.log("안 빈 배열");

🍅삼항 연산식의 대입

const arr = [1, 23];

const arrayStatus = arr.length === 0 ? "빈" : "안빈";
console.log(arrayStatus);   //안빈
  • 대입 연산자를 이용하여 삼항 연산자의 반환값을 대입할 수도 있다. 

🍅삼항 연산자의 truthy, falsy 이용

let a = [];

const result = a ? true : false;
console.log(result);    //true

🍅삼항 연산자의 중첩

//TODO : 학점 계산 프로그램
//90점 이상 A+
//50점 이상 B+
//둘 다 아니면 F

let score = 40;

score >= 90
    ? console.log("A+")
    :score >= 50
    ?console.log("B+")
    :console.log("F");

//F
  • 하지만 보기 힘들다는 단점이 있다. 
let score = 40;

if (score >= 90) {
    console.log("A+");
} else if(score >= 50) {
    console.log("B+");
} else {
    console.log("F");
}
  • 이런 경우 일반 조건문이 더 가독성이 좋다. 

단락 회로 평가

🍅true와 false에서의 단락 회로 평가

console.log(true && true);  //true
console.log(true || false); //true
console.log(!true);         //false

🍅truthy와 falsy에서의 단락 회로 평가

const getName = (person) => {
    if(!person) {
        return "객체가 아닙니다."
    }
    return person.name;
};

let person;
const name=getName(person);
console.log(name);  //객체가 아닙니다.
  • 해당 함수를 단락 회로 평가를 이용하여 단축해보자. 
const getName = (person) => {
    return person && person.name;
};

let person;
const name=getName(person);
console.log(name);  //undefined
  • 논리 연산에서 person은 undefined라는 falsy한 값으로 인식되기 때문에 뒤에 있는 값을 고려하지 않는다. 
  • 이때 falsy했기 때문에 값을 그대로 리턴하여 undefined라는 값이 반환된다.
  • person이 null이 였을 경우 null이 반환된다. 
const getName = (person) => {
    const name = person && person.name;
    return name || "객체가 아닙니다";
};

let person;
let person1 = {name: "cloudmato"};

const name = getName(person);
const name1 = getName(person1);

console.log(name);  //객체가 아닙니다.
console.log(name1); //cloudmato
  • 반환할 값을 설정해 줄 수도 있다. 

조건문 업그레이드

🍅includes 이용

function isKoreanFood(food) {
    if(food === "불고기" || food === "비빔밥" || food === "떡볶이") {
        return true;
    }
    return false;
}

const food1 = isKoreanFood("불고기");
const food2 = isKoreanFood("파스타");

console.log(food1); //true
console.log(food2); //false
  • 케이스가 너무 많기 때문에 큰 의미가 없다. 
function isKoreanFood(food) {
    if(["불고기", "떡볶이", "비빔밥"].includes(food)) {
        return true;
    }
    return false;
}

const food1 = isKoreanFood("불고기");
const food2 = isKoreanFood("파스타");

console.log(food1); //true
console.log(food2); //false
  • includes 메서드를 이용해여 배열 안에 존재하는지 확인하는 식으로 변경

🍅프로퍼티 접근 이용

const meal = {
    한식 : "불고기",
    일식 : "초밥",
    인도식 : "커리",
    중식 : "멘보샤"
};

const getMeal = (mealType) => {
    return meal[mealType] || "굶기";
};

console.log(getMeal("중식"));   //멘보샤
console.log(getMeal());        //굶기

비 구조화 할당

let arr = ["one", "two", "three"];

let one = arr[0];
let two = arr[1];
let three = arr[2];

console.log(one, two, three);
  • 해당 3개의 할당 과정을 한 줄로 바꿔보자. 

🍅배열의 기본 변수 비구조화 할당

let arr = ["one", "two", "three"];

let [one, two, three] = arr;

console.log(one, two, three);
  • 이렇듯 대괄호를 이용해서 배열의 값을 순서대로 할당받아서 사용할 수 있는 방법을 배열의 비구조화 할당이라고 한다. 

🍅배열의 선원분리 비구조화 할당

let [one, two, three] = ["one", "two", "three"];

console.log(one, two, three);
  • 더 줄일 수 있다. 

🍅swap에서의 비구조화 할당 이용

let a = 10;
let b = 20;
let tmp = 0;

tmp = a;
a = b;
b = tmp;
console.log(a, b);  //20,10
  • 해당 코드를 줄여보자. 
let a = 10;
let b = 20;


[a,b] = [b,a];
console.log(a, b);	//20, 10
  • 비구조화 할당을 이용하여 swap이 이루어졌다. 

🍅객체의 비구조화 할당

let object = {one: "one", two: "two", three: "three"};

let one = object.one;
let two = object.two;
let three = object.three;

console.log(one, two, three);   //one two three
  • 해당 코드를 줄여보자. 
let object = {one: "one", two: "two", three: "three", name: "cloudmato"};

let {name, one, two, three} = object

console.log(one, two, three, name); //one two three cloudmato
  • 객체에서도 배열의 비구조화 할당을 사용할 수 있다. 
  • 이때 순서는 상관 없다. 왜냐하면 순서가 아닌 키값을 기준으로 할당이 이루어지기 때문.
  • 키값을 이용하여 비구조화 할당을 해야한다는 변수 이름에 대한 한계가 있다. 하지만 극복할 수 있는 방법이 있다. 
let object = {one: "one", two: "two", three: "three", name: "cloudmato"};

let {name: myName, one, two, three} = object

console.log(one, two, three, myName); //one two three cloudmato
  • 다음과 같이 원래 키값: 내가 사용하고 싶은 변수이름 이런 식으로 명시해주면 다른 변수명으로 할당 가능하다. 
let object = {one: "one", two: "two", three: "three", name: "cloudmato"};

let {name: myName, one, two, three, abc="four"} = object

console.log(one, two, three, myName, abc); //one two three cloudmato fore
  • abc = "four"과 같이 기본값을 설정해 줄 수도 있다. 

Spread 연산자

🍅객체에서의 spread연산자의 사용

const cookie = {
    base: "cookie",
    madeIn: "korea"
};

const chocochipCookie = {
    ...cookie,
    toping: "chocochip"
};

const blueberryCookie = {
    ...cookie,
    toping: "blueberry"
};

const strawberryCookie = {
    ...cookie,
    toping: "strawberry"
};

console.log(chocochipCookie);
console.log(strawberryCookie);
console.log(blueberryCookie);

// { base: 'cookie', madeIn: 'korea', toping: 'chocochip' }
// { base: 'cookie', madeIn: 'korea', toping: 'strawberry' }
// { base: 'cookie', madeIn: 'korea', toping: 'blueberry' }
  • 스프레드 연산자(...)를 통해서 객체의 중복되는 프로퍼티를 펼쳐 사용할 수 있다. 

🍅배열에서의 spread연산자 사용

const noTopingCookies = ['촉촉한쿠키', '안촉촉한쿠키'];
const topingCookies = ['바나나쿠키', '블루베리쿠키', '딸기쿠키', '초코칩쿠키'];

const allCookies = [...noTopingCookies, "함정쿠키", ...topingCookies];
console.log(allCookies);

//[ '촉촉한쿠키', '안촉촉한쿠키', '함정쿠키', '바나나쿠키', '블루베리쿠키', '딸기쿠키', '초코칩쿠키' ]
  • 다음과 같이 배열에서도 사용할 수 있다. 
  • 배열의 내장함수인 concat을 사용할 수도 있지만 스프레드 함수를 사용하면 중간에 '함정쿠키'와 같이 유연하게 활용을 할 수 있다. 

동기 & 비동기

:순서대로 실행하는 것과 그렇지 않은 것들

🍅동기 방식의 처리 - 블로킹 방식

  • 자바스크립트는 싱글 스레드 언어이다. 
  • 자바 스크립트는 코드가 작성된 순서대로 작업을 처리한다. 
  • 이전 작업이 진행 중일 때는 다음 작업을 수행하지 않고 기다린다.
  • 먼저 작성된 코드가 다 실행이 된 이후에  뒤에 작성된 코드를 실행한다. 
  • Tread  - taskA----- taskB--------------- tastC--|

🍅동기처리 방식의 문제점

  • 하나의 작업이 너무 오래 걸리게 될 시,
  • -> 모든 작업이 오래 걸리는 하나의 작업이 종료되기 전까지 대기해야 한다.
  • -> 전반적인 흐름이 느려진다. 

🍅멀티 쓰레드

  • 코드를 실행하는 일꾼 Thread를 여러 개 사용하는 방식인 멀티 쓰레드 방식으로 작동시키면 분할 작업이 가능하다. 
  • 오래걸리는 일이 있어도 다른 Tread에게 지시하는 방식. 
  • Tread    taskA----|
  • TreadA taskB----------|
  • TreadC taskC--|
  • 그러나 자바스크립트는 싱글쓰레드 사용. 

🍅비동기 작업 - 논블로킹 방식

  • 싱글 쓰레드 방식을 이용하면서, 동기적 작업의 단점 극복을 위해 여러 개의 작업 동시에 실행시킴
  • 즉, 먼저 작성된 코드의 결과를 기다리지 않고 다음 코드를 바로 실행한다. 
  • Tread  taskA----|
  •             taskB-------------|
  •             taskC--|
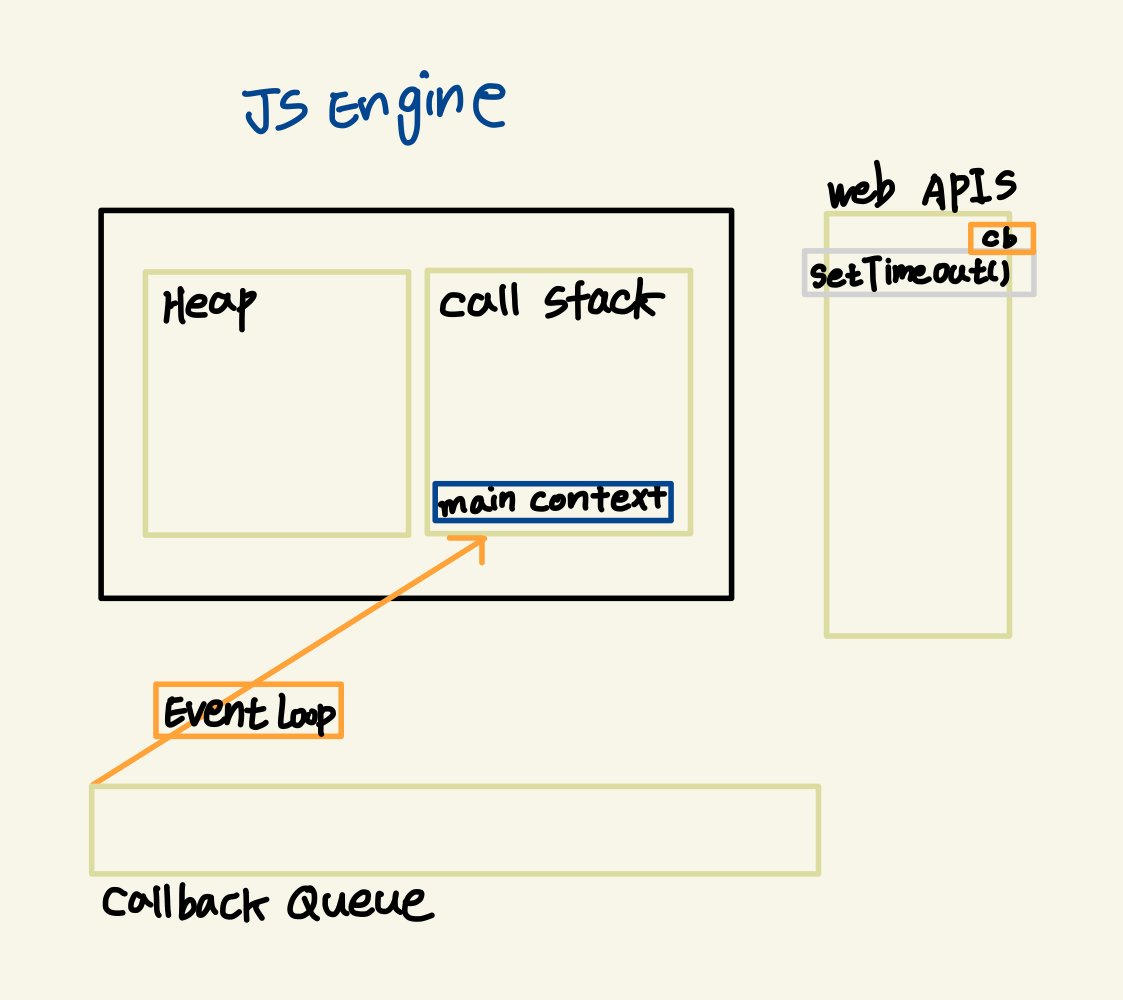
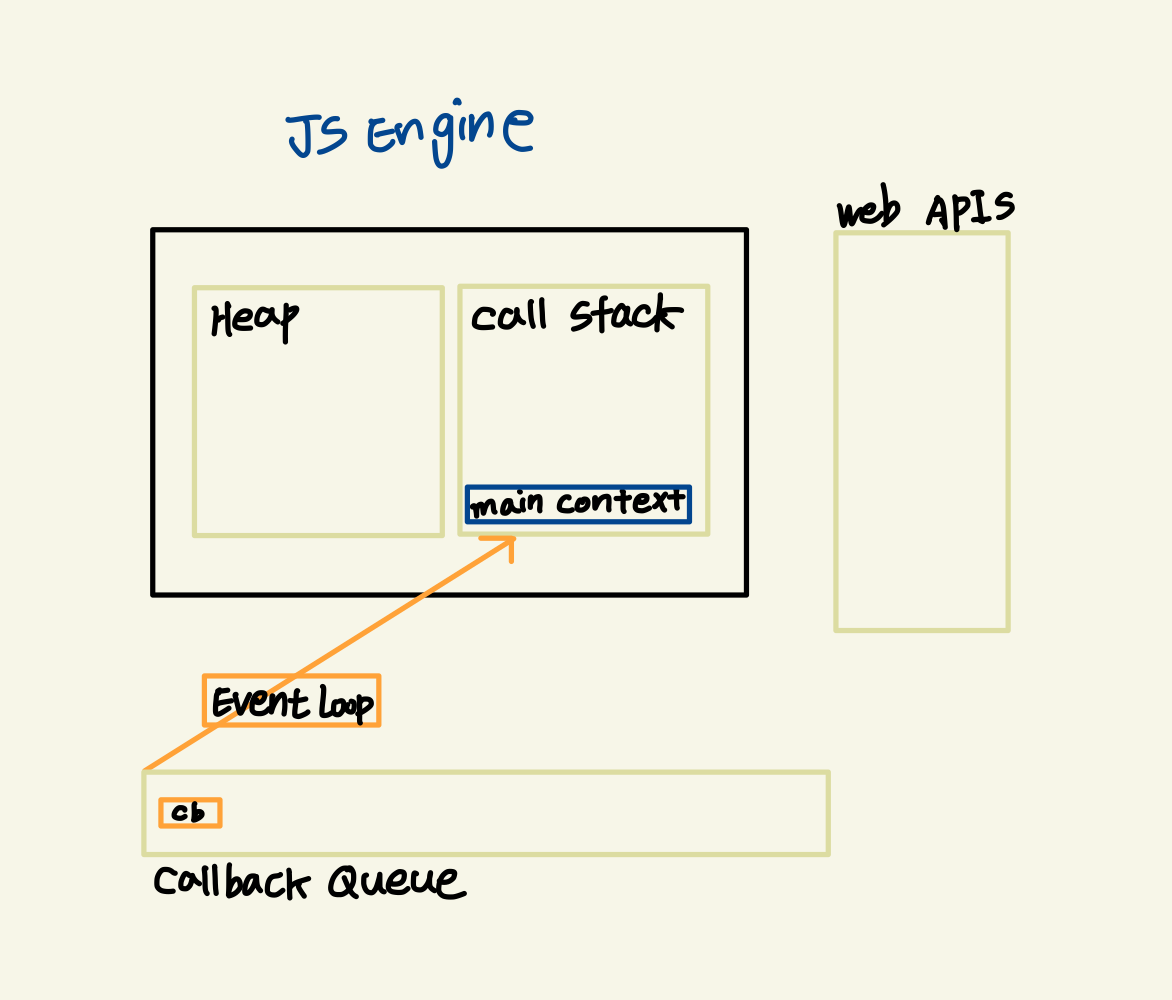
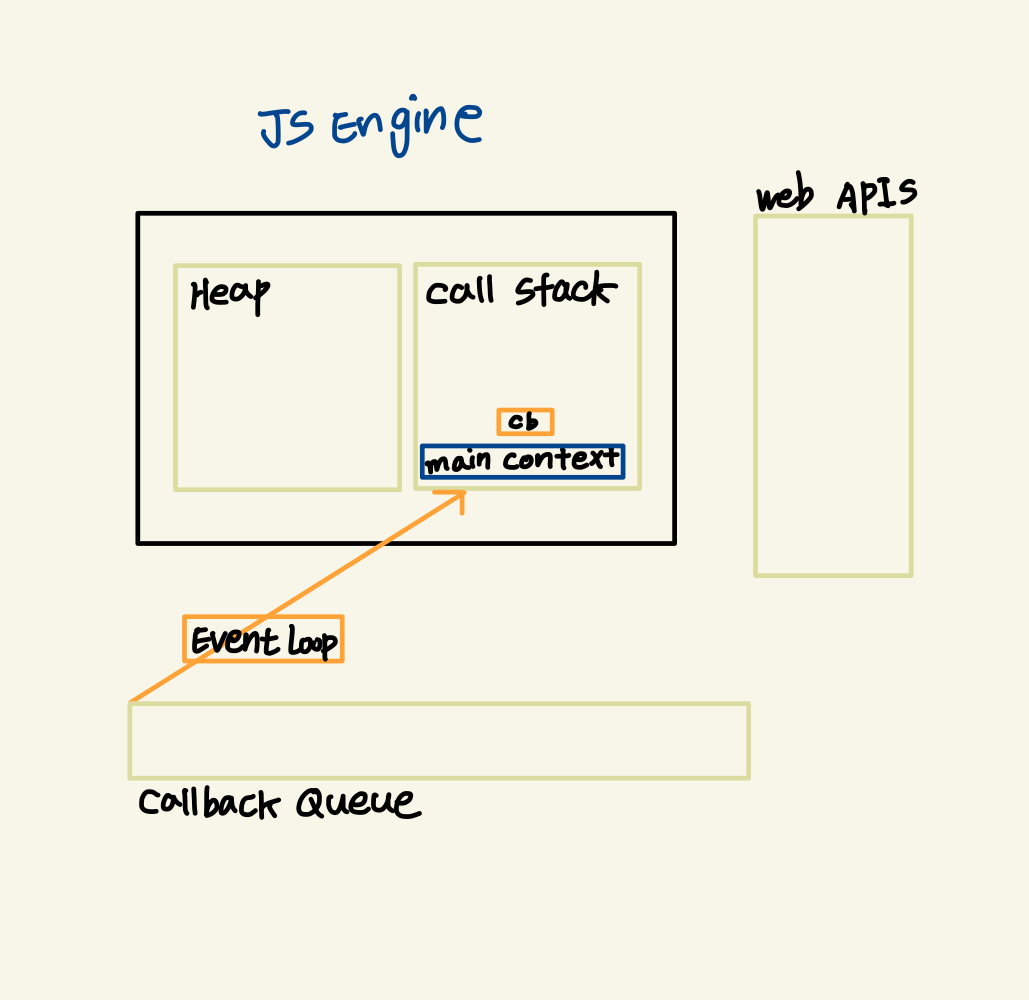
  • 비동기 처리를 할 때는 우리가 자바스크립트에서 함수를 호출할 때 콜백 함수를 붙여서 그 비동기 처리의 결과값이나 끝났는지의 여부를 확인하는 역할을 하게 된다. 

🍅코드로 확인하기

function taskA() {
    console.log("A작업 끝");
};

taskA();
console.log("코드 끝");

/*결과
  A작업 끝
  코드 끝 
 */
  • 우리가 알게 모르게 사용해왔던 동기적 방식. 
  • taskA가 끝난 후에야 다음 코드가 실행된다. 
function taskA() {
    setTimeout(() => {
        console.log("A TASK END");
    }, 2000)
};

taskA();
console.log("코드 끝");

/* 결과
	코드 끝
    A TASK END
*/
  • 먼저 지시된 작업을 끝나기까지 기다리지 않고 그냥 다음 작업업을 바로 실행하는 비동기 방식. 
  • setTimeout함수는 두 개의 파라미터를 받는다. (콜백함수, 시간(ms단위))
function taskA(a, b, cb) {
    setTimeout(() => {
        const res = a + b;
        cb(res);
    }, 3000)
};

taskA(3,4,(res)=>{
    console.log("A TASK RESULT : ", res)});
console.log("코드 끝");

/**
 * 코드 끝
 * A TASK RESULT :  7
 */

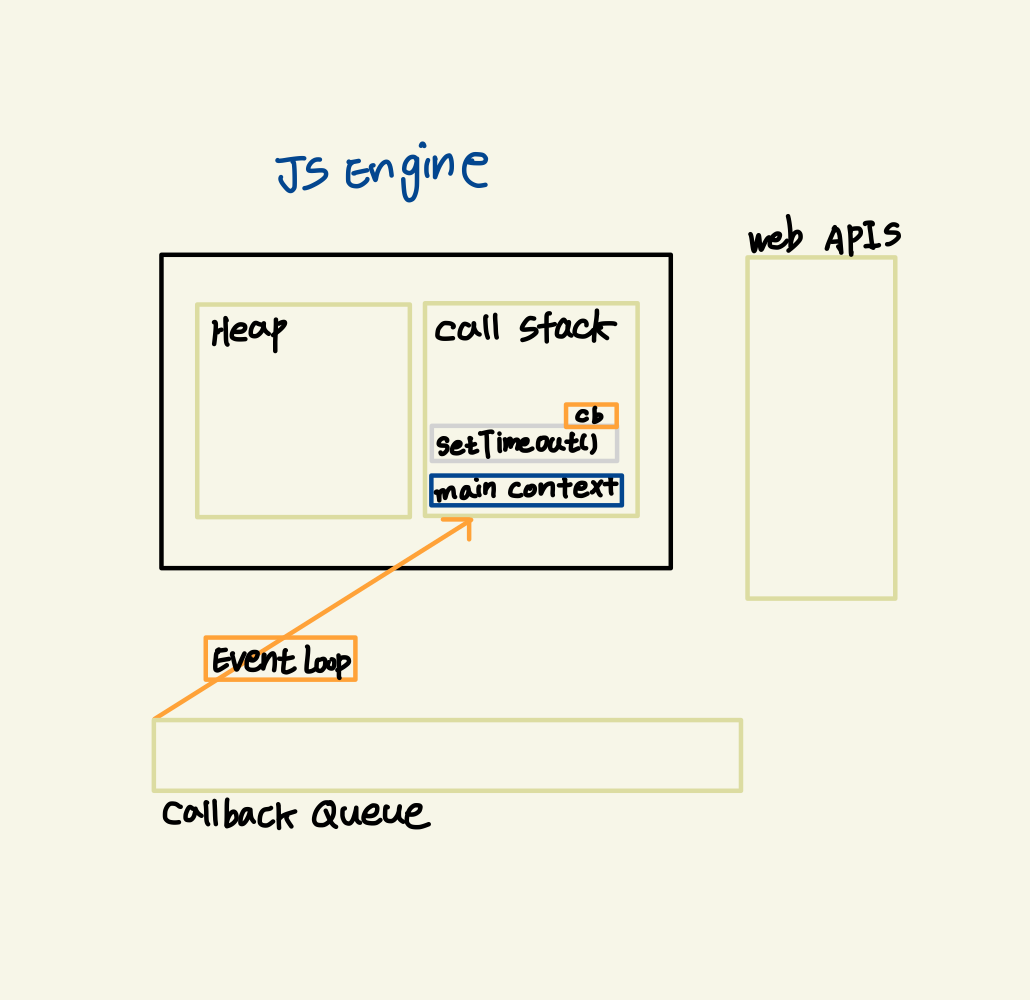
🍅자바스크립트엔진의 비동기 처리

  • 작성한 글 날라감 이슈로 그림만..


Promise - 콜백 지옥에서 탈출하기

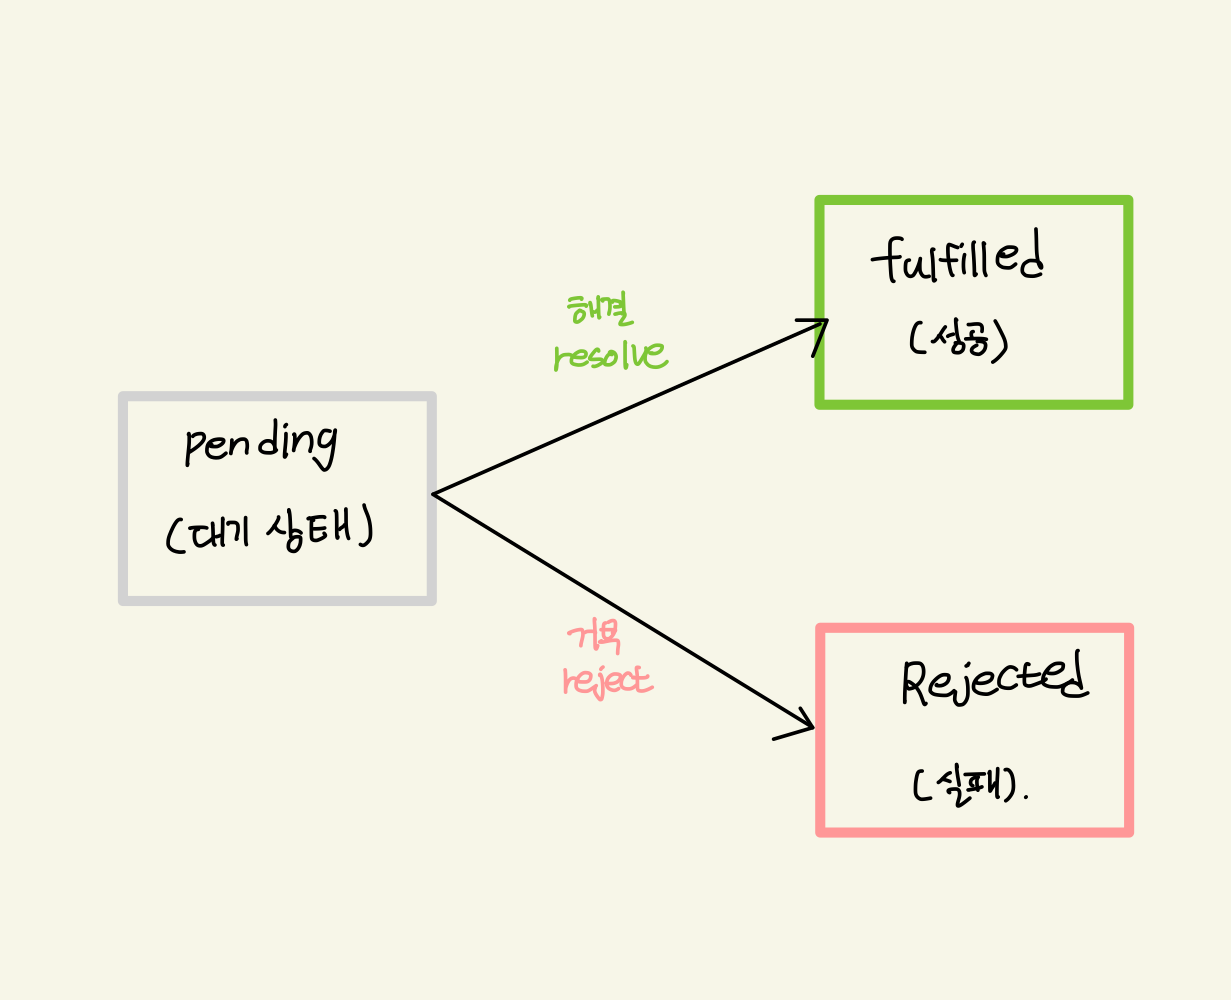
  • 자바스크립트의 비동기를 돕는 객체
  • 비동기 처리의 결과값을 핸들링하는 코드를 비동기 함수로부터 분리할 수 있다. 

🍅비동기 작업이 가질 수 있는 3가지 상태

🍅콜백 함수를 이용한 비동기 처리

//2초 후에 이 수가 양수인지, 음수인지 판단하는 함수. 

function isPositive(number, resolve, reject) {
    setTimeout(() => {
        if(typeof number === "number") {
            //성공 -> resolve
            resolve(number >= 0? "양수":"음수")
        } else {
            //실패 -> reject
            reject("주어진 값이 숫자형 값이 아닙니다")
        }
    },2000)
};

isPositive([], (res)=> {
    console.log("성공적으로 수행됨 : ", res);
}, (err)=> {
    console.log("실패 하였음 : ", err);
});

🍅Promise 사용

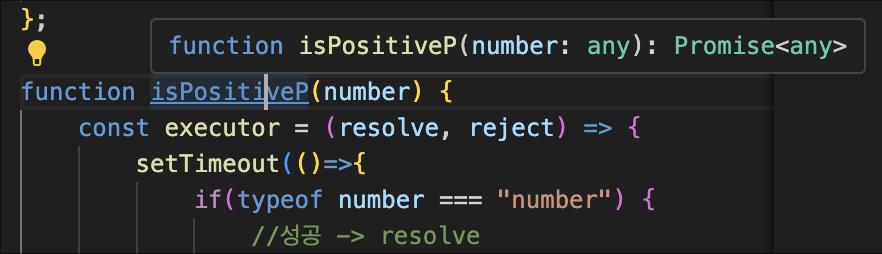
  • 어떤 함수가 promise를 반환한다는 것은 이 함수는 비동기 작업을 하고 작업의 결과를 promise 객체로 반환 받아서 사용할 수 있는 함수라는 것이다. 
function isPositiveP(number) {
    const executor = (resolve, reject) => {
        setTimeout(()=>{
            if(typeof number === "number") {
                //성공 -> resolve
                console.log(number);
                resolve(number >= 0? "양수":"음수")
            } else {
                //실패 -> reject
                reject("주어진 값이 숫자형 값이 아닙니다")
            }
        },2000);
    };

    const asyncTask = new Promise(executor);
    return asyncTask;
}

const res = isPositiveP([]);
res.then((res)=>{console.log("작업 성공 : ", res)}).catch((err)=>console.log("작업 실패 :", err));

🍅Promise로 콜백지옥 탈출하기

function taskA(a,b,cb) {
    setTimeout(()=>{
        const res = a+b;
        cb(res);
    }, 3000);
}
function taskB(a,cb) {
    setTimeout(()=>{
        const res = a * 2;
        cb(res);
    }, 1000);
}
function taskC(a,cb) {
    setTimeout(()=>{
        const res = a * -1;
        cb(res);
    }, 2000);
}

taskA(3,2,(a_res)=>{
    console.log("taskA : ", a_res);
    taskB(a_res,(b_res)=>{
        console.log("taskB : ", b_res);
        taskC(b_res,(c_res)=>{
            console.log("taskC : ", c_res);
        });
    });
});
  • 이전코드이다.
  • 콜백이 계속 안으로 들어가며 콜백헬, 콜백 지옥이 생긴 모습이다. 
  • Promise로 해결해보자. 
function taskA(a,b) {
    return new Promise((resolve, reject)=>{
        setTimeout(()=>{
            const res = a+b;
            resolve(res);
        }, 3000);
    });
}
function taskB(a) {
    return new Promise((resolve, reject)=>{
        setTimeout(()=>{
            const res = a * 2;
            resolve(res);
        }, 1000);
    });
};
function taskC(a) {
    return new Promise((resolve, reject)=>{
        setTimeout(()=>{
            const res = a * -1;
            resolve(res);
        }, 2000);
    });
}

taskA(5,1).then((a_res)=>{
    console.log("A RESULT : ", a_res);
    taskB(a_res).then((b_res)=>{
        console.log("B RESULT : ", b_res);
        taskC(b_res).then((c_res)=>{
            console.log("C RESULT : ", c_res);
        });
    });
});
  • 기대한 것과는 다르다. 
  • 그 이유는 then을 콜백 함수를 쓰는 식으로 사용했기 때문.
  • 바꿔서 다시 해보자. 
function taskA(a,b) {
    return new Promise((resolve, reject)=>{
        setTimeout(()=>{
            const res = a+b;
            resolve(res);
        }, 3000);
    });
}
function taskB(a) {
    return new Promise((resolve, reject)=>{
        setTimeout(()=>{
            const res = a * 2;
            resolve(res);
        }, 1000);
    });
};
function taskC(a) {
    return new Promise((resolve, reject)=>{
        setTimeout(()=>{
            const res = a * -1;
            resolve(res);
        }, 2000);
    });
}

taskA(5,1).then((a_res)=>{
    console.log("A RESULT : ", a_res);
    return taskB(a_res);
})
.then((b_res)=> {
    console.log("B RESULT : ", b_res);
    return taskC(b_res);
})
.then((c_res)=>{
    console.log("C RESULT : ",c_res);
});
  • 이렇게 then으로 계속해서 이어나가는 방식을 then chaining방식이라고 한다. 
  • 이런 방법이 가능한 이유는 return으로 promise를 반환해준 것이나 마찬가지기 때문에 then을 사용할 수 있는 것이다. 
  • 콜백을 계속 이용했다면 > 이런 모양으로 들어가게 되는데 promise를 사용함으로써 해결이 되었다. 
const bPromiseResult = taskA(5,1).then((a_res)=>{
    console.log("A RESULT : ", a_res);
    return taskB(a_res);
});

console.log("dfdfdfdf");

bPromiseResult
.then((b_res)=> {
    console.log("B RESULT : ", b_res);
    return taskC(b_res);
})
.then((c_res)=>{
    console.log("C RESULT : ",c_res);
});
  • 이런 식으로 중간에 다른 식을 끼워 넣은 후에 호출할 수 있다는 장점도 있다. 
  • 따라서 promise함수를 사용하면 콜백 함수를 피하고 좀 더 가독성 있고 깔끔한 비동기 처리를 할 수 있도록 도와준다. 

async & await - 직관적인 비 동기 처리 코드 작성하기

  • async와 await는 promise를 더 쉽고 가독성 좋게 작성할 수 있게 해준다. 

🍅async

//async

function hello() {
    return 'hello';
}

async function helloAsync() {
    return 'hello Async';
}

console.log(hello());       //hello
console.log(helloAsync());  //Promise { 'hello Async' }
  • hello()의 결과값과 달리 helloAsync()는 Promise객체가 그대로 리턴되었다. 
  • async를 함수 앞에 작성하면 자동으로 promise객체를 리턴하는 비동기 처리 함수가 된다. 
//async

function hello() {
    return 'hello';
}

async function helloAsync() {
    return 'hello Async';
}

helloAsync().then((res)=>{
    console.log(res);
})
//결과: hello Async
  • helloAsync()함수는 Promise를 리턴하기 때문에 then으로 정리해주었다. 

🍅await

function delay (ms) {
    return new Promise((resolve)=>{
        setTimeout(resolve,ms);
    })
}

async function helloAsync() {
    return delay(3000).then(()=>{
        return 'hello Async'})}

helloAsync().then((res)=>{
    console.log(res);
})
//결과: hello Async
  • await을 사용하지 않은 코드
function delay (ms) {
    return new Promise((resolve)=>{
        setTimeout(resolve,ms);
    })
}

async function helloAsync() {
    await delay(3000);
    return "hello async";
    }

helloAsync().then((res)=>{
    console.log(res);
})

//결과: hello Async
  • await을 사용한 코드
  • await키워드를 비동기 함수의 호출 앞에 붙이게 되면 비동기 함수가 마치 동기적인 함수처럼 작동을 하게 된다. 
  • await키워드는 async키어드가 붙은 함수 내에서만 사용할 수 있다. 
function delay (ms) {
    return new Promise((resolve)=>{
        setTimeout(resolve,ms);
    })
}

async function helloAsync() {
    await delay(3000);
    return "hello async";
}

async function main() {
    const res = await helloAsync();
    console.log(res);    
}

main();


//결과: hello Async


API 호출하기

🍅API (Application Programming Interface)

  • 응용 프로그램 프로그래밍 인터페이스

이정환님의 인프런 [한입 크기로 잘라 먹는 리액트(React.js) : 기초부터 실전까지]강좌를 참고하여 작성하였습니다. 

https://www.inflearn.com/course/%ED%95%9C%EC%9E%85-%EB%A6%AC%EC%95%A1%ED%8A%B8#


한입 크기로 잘라 먹는 리액트(React.js) : 기초부터 실전까지 - 인프런 | 강의

개념부터 독특한 프로젝트까지 함께 다뤄보며 자바스크립트와 리액트를 이 강의로 한 번에 끝내요. 학습은 짧게, 응용은 길게 17시간 분량의 All-in-one 강의!, 리액트, 한 강의로 끝장낼 수 있어요.

www.inflearn.com


Hello World

🍅 자바 스크립트란?

  • HTML
  • CSS
  • Javascript

🍅 자바 스크립트의 실행 환경

  • 엔진

🍅 실습

  • 개발자 도구 이용(F12)
  • codesandbox 이용(해당 강의에선 Vanilla  템플릿 사용)

변수와 상수

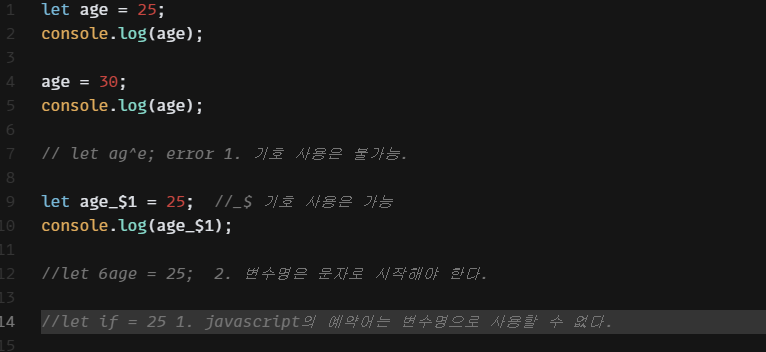
  • 변수는 let을 이용하여 선언할 수 있다. 

🍅 변수명 명명 규칙

  • 기호 사용은 불가능하다. (단, _$ 기호는 사용 가능하다.)
  • 변수명은 문자로 시작해야 한다. 즉, 숫자로 시작하는 것은 불가능하다. 
  • javascript의 예약어는 변수명으로 사용할 수 없다. 

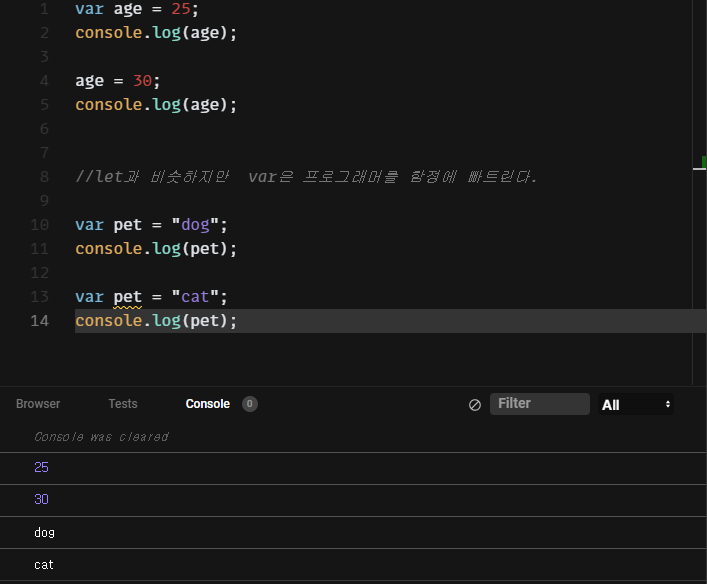
🍅 var을 이용한 변수 선언

  • 같은 변수명으로 새로운 값을 새롭게 선언하여도 오류가 나지 않는다. 
  • 그래서 앞으로 실수는 let으로 선언. 

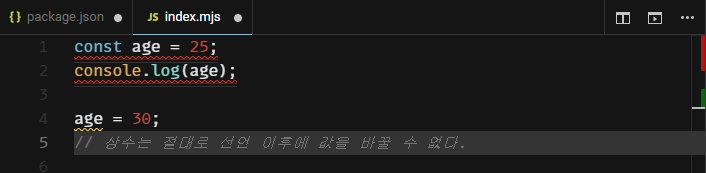
🍅 상수

  • 상수는 선언 이후에 값을 변경하는 것이 불가능하다. 

자료형과 형 변환

🍅 자바스크립트의 자료형

  • Primitive Type (원시타입) :
    • 한 번에 하나의 값만 가질 수 있음. 하나의 고정된 저장 공간 이용
  • Non - Primitive Type (비 원시 타입)
    • 한번에 여러 개의 값을 가질 수 있음 여러 개의 고정되지 않은 동적 공간 사용

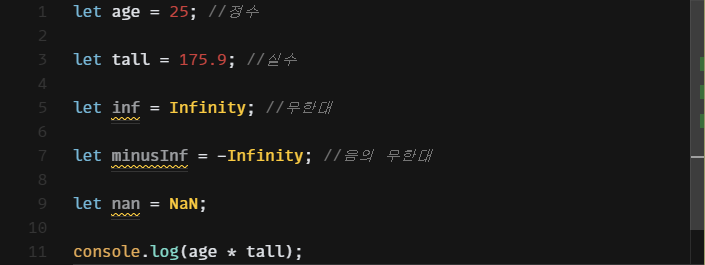
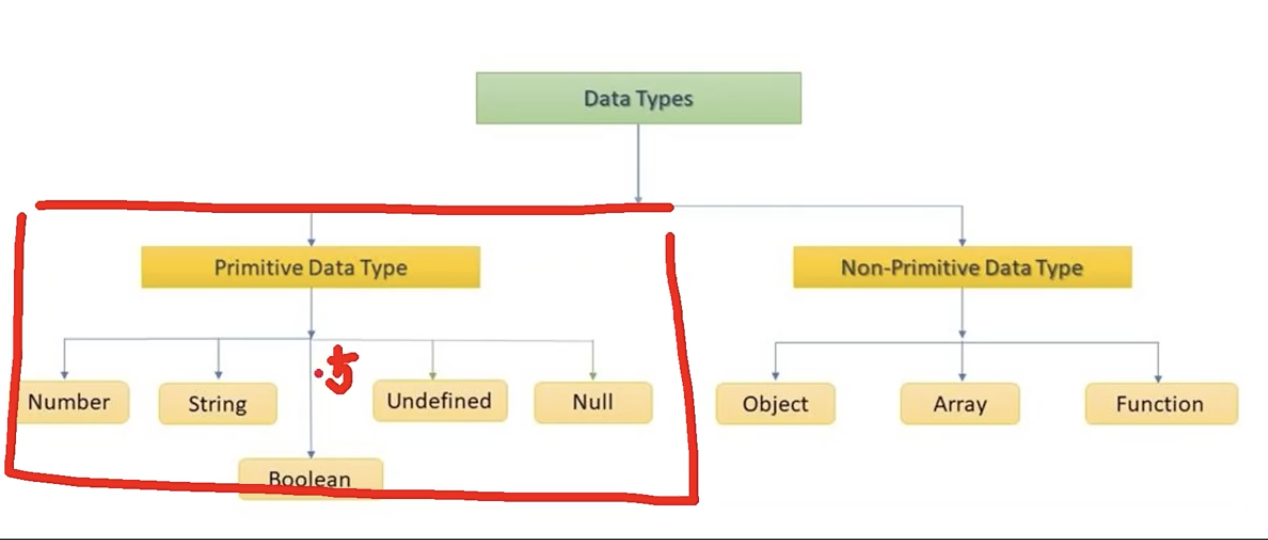
🍅 원시타입

  • 숫자형

  • 문자형

  •  boolean 형

  • Null 

  • undefined

🍅 형변환

  • 묵시적 형 변환

  •  명시적 형 변환


연산자

🍅 대입 연산자

🍅 산술 연산자

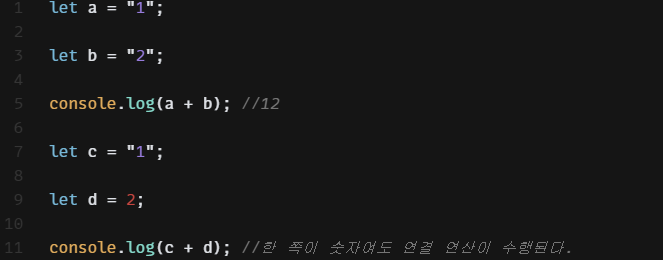
🍅 연결 연산자

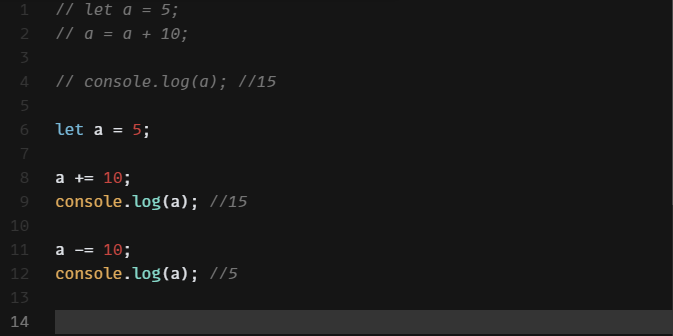
🍅 복합 연산자

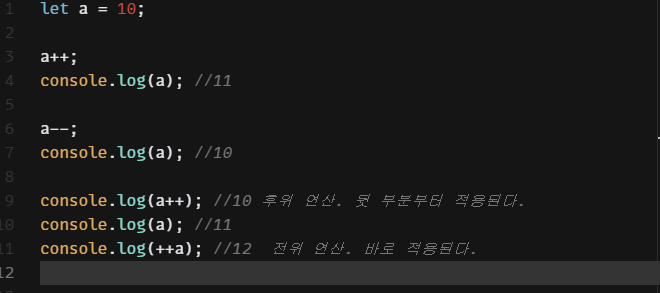
🍅 증감 연산자

  • 숫자형에만 사용할 수 있다. 

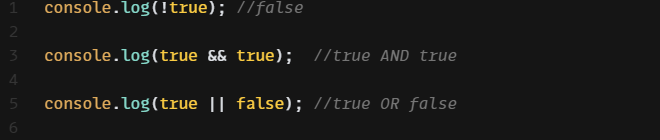
🍅 논리 연산자

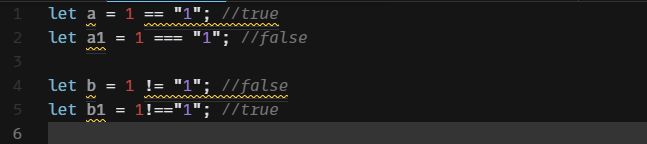
🍅 비교 연산자

== 자료형에 관계없이 값이 같다. 
=== 엄격하게 같다. (자료형과 값이 같다.)
!= 자료형에 관계없이 같지 않다. 
!== 엄격하게 같지 않다. (자료형과 값이 다르다.)

< 작다
<= 작거나 같다
> 크다
>= 크거나 같다

🍅 typeof  연산자

🍅 Null 병합 연산자

  • a 가  null이거나 undefined 이면  a, 아니면 10을 할당한다. 

조건문

  • 참 거짓에 따라서 각자 다른 지시를 내리기 위해 사용

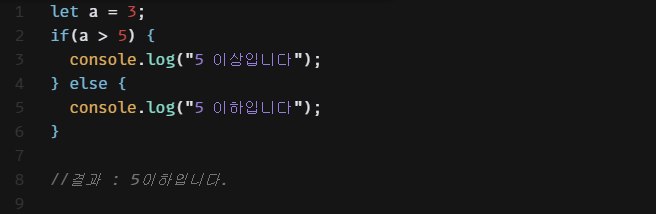
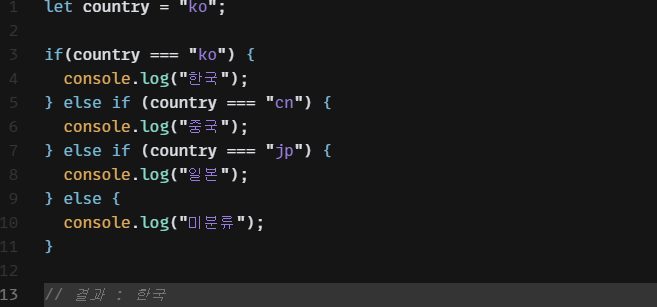
🍅if - else if - else 문

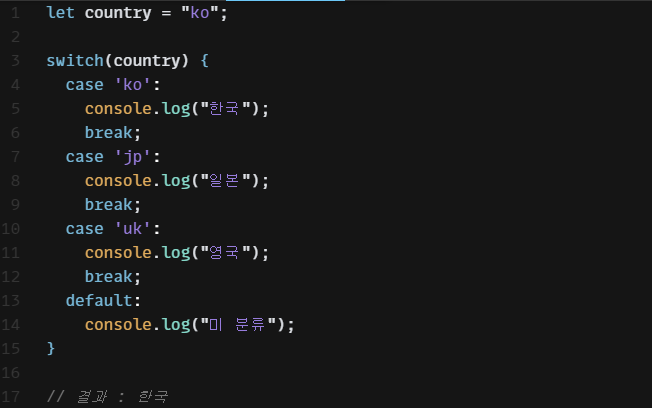
🍅 switch  문


함수


함수표현식 & 화살표 함수


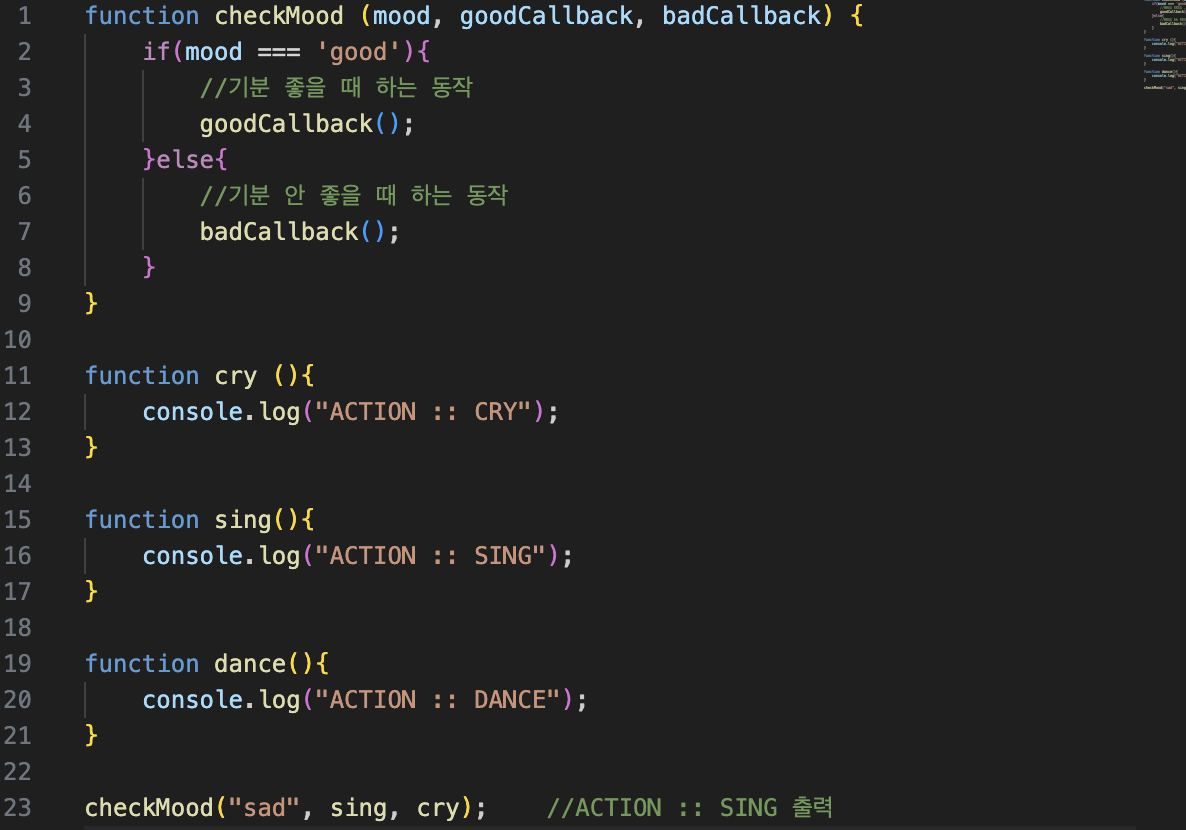
콜백함수

매개변수에 함수를 넣는다. 


객체

객체는 여러가지 데이터를 담을 수 있는 Non-Primitive Type(비 원시 타입)이다. 

🍅 객체를 생성

let person1 = new Object(); //생성자 방식

let person2 = {};    //객체 리터럴 방식


let person = {
    key: "value",   //프로퍼티 (객체 프로퍼티)
    key1: 123,
    key2: true,
    key3: undefined,
    key4: [1,2],
    key5: function () {}
};    //객체 리터럴 방식

console.log(person);    
//{
//  key: 'value',
//  key1: 123,
//  key2: true,
//  key3: undefined,
//  key4: [ 1, 2 ],
//  key5: [Function: key5]
//} 출력
  • 객체는 key와 value로 이루어진 프로퍼티로 이루어진다. 
  • 어떠한 자료형이라도 value값으로 들어갈 수 있으며, key는 문자열이여야만 한다. 

🍅 객체의 값을 이용하는 방법

let person = {
    name: "cloudmato",
    age: 24
};

console.log(person["name"]);    //괄호 표기법 cloudmato
console.log(person.age);        //점 표기법 24
  • 괄호 표기법과 점 표기법이 있다. 
  • 다만 괄호 표기법으로 객체의 값을 이용할 때에는 반드시 문자열("")형태로 이용해야 한다. 
  • 문자열로 이용하지 않을 경우 변수로 인식하기 때문. 
//괄호 표기법에 ""사용을 안하려고 할 경우 변수를 만들어 사용하면 된다. 
const nameV = "name";
console.log(person[nameV]);
// 동적으로 파라미터를 넣을 상황에는 괄호 표기법이 적절하다. 

let person = {
    name: "cloudmato",
    age: 24
};

console.log(getPropertyValue("name"));

function getPropertyValue (key){
    return person[key];
}

🍅 객체 생성 이후에 프로퍼티 추가/수정

let person = {
    name: "cloudmato",
    age: 24
};

//주소지를 프로퍼티로 넣고 싶은 상황. 
person.location = "korea";  //점 표기법 이용. 
person["gender"] = "female" //괄호 표기법 이용

//프로퍼티의 값 수정. 
person.name = "cloudmato00";
person["age"] = 25;

console.log(person);
  • 생성된 객체는 점 표기법과, 괄호 표기법을 이용해서 값을 추가/수정 가능하다.
// let person = {
//     name: "cloudmato",
//     age: 24
// };

const person = {
    name: "cloudmato",
    age: 24
};

//주소지를 프로퍼티로 넣고 싶은 상황. 
person.location = "korea";  //점 표기법 이용. 
person["gender"] = "female" //괄호 표기법 이용

//프로퍼티의 값 수정. 
person.name = "cloudmato00";
person["age"] = 25;

console.log(person);
  • 이때, 객체를 let에서 const로 바꿔도 오류가 나지 않는다.
  • 왜냐하면 person이라는 상수가 갖는 객체(Object)를 수정한 것이지, person이라는 상수 자체를 바꾼 것이 아니기 때문.
person = {
    age: 20
}
  • 상수를 변경하는 경우는 다음과 같이 대입연산자(=)를 통하여  상수 자체에 새로운 객체를 대입하는 것이다. 
  • 따라서 자유로운 추가/수정이 가능하다. 

🍅프로퍼티의 삭제 - 

delete 사용

const person = {
    name: "cloudmato",
    age: 24
};
console.log(person);    //{ name: 'cloudmato', age: 24 }

delete person.age;      //점 표기법 사용
console.log(person);    //{ name: 'cloudmato' }

delete person["name"];  //괄호 표기법 사용
console.log(person);    //{}
  • 그러나 이런 방법은 객체인 person과 이 property간의 연결만 끊을 뿐 실제 메모리는 그대로 사용하게 된다.

= null 사용

const person = {
    name: "cloudmato",
    age: 24
};

person.name = null;

console.log(person);
  • null을 대입할 경우 메모리에서도 삭제할 수 있으므로 이런 방법을 추천해주셨다.  

🍅 객체의 메서드

const person = {
    name: "cloudmato",  //member
    age: 24,            //member
    say: function () {
        console.log("hello");
    }   //method -> 방법
};

person.say();
person["say"]();
  • 객체의 프로퍼티 중 함수를 메서드, 함수가 아닌 것을 멤버라고 한다. 
const person = {
    name: "cloudmato", 
    age: 24,           
    say: function () {
        console.log(`안녕 나는 ${this.name}`);
        console.log(`안녕 내 나이는 ${this["age"]}`);
    }  
};

person.say();
// 안녕 나는 cloudmato
// 안녕 내 나이는 24
  • this를 사용하여 객체의 메서드에서 멤버를 접근할 수 있다. 

🍅 존재하지 않는 프로퍼티에 접근한 경우

const person = {
    name: "cloudmato", 
    age: 24,           
    say: function () {
        console.log(`안녕 나는 ${this.name}`);
        console.log(`안녕 내 나이는 ${this["age"]}`);
    }  
};

console.log(person.gender); //undefined
  • 에러를 일으키지 않고 undefined를 띄운다. 
  • 이러한 방식은 유연한 프로그래밍을 가능하게 하지만 잘못된 연산을 하게 할 수도 있다. 
const person = {
    name: "cloudmato", 
    age: 24,           
    say: function () {
        console.log(`안녕 나는 ${this.name}`);
        console.log(`안녕 내 나이는 ${this["age"]}`);
    }  
};

console.log(`name : ${"name" in person}`);   //true
console.log(`name : ${"hobby" in person}`);  //false
  • in 연산자를 객체와 함께 활용하면 프로퍼티의 존재 여부를 boolean형태로 알 수 있다. 

배열

🍅배열

  • 배열은 비원지 자료형에 해당하며, 순서 있는 요소들의 집합, 즉 여러개의 항목이 들어있는 리스트이다. 
  • 여러가지 자료형이 들어갈 수 있는 특징이 있다. 
let arr = new Array();  //생성자를 이용한 생성
let arr1 = [];          //배열 리터럴

console.log(arr);  //[]
🍅배열의 각 인덱스에 접근하기

let arr = [1,2,3,4,5];
console.log(arr);

console.log(arr[0]);    //1
console.log(arr[1]);    //2
console.log(arr[2]);    //3
console.log(arr[3]);    //4
console.log(arr[4]);    //5
  • 배열의 이름을 쓰고 대괄호 안에 인덱스를 사용하여 접근한다. 

🍅배열 요소 추가 - push

let arr = [1,2,3,4,5];

arr.push(6);
console.log(arr);   //[ 1, 2, 3, 4, 5, 6 ]
arr.push({key: "value"});
console.log(arr);   //[ 1, 2, 3, 4, 5, 6, { key: 'value' } ]
  • push를 이용하여 요소를 추가하면 마지막 인덱스 그 다음 인덱스에 요소가 추가된다. 
  • 이때, 어떤 자료형이라도 추가할 수 있다. 

🍅배열의 길이

let arr = [1,2,3,4,5];

console.log(arr.length);    //5

반복문

  • 반복문이란 특정 명령을 반복해서 수행해야 할 때 사용하는 문법이다. 

🍅for 반복문

for(let i = 0; i < 5; i++) {
    console.log("cloudmato");
}

🍅for 반복문을 이용한 배열 순회

const arr = ["a", "b", "c"];

for(let i = 0; i < arr.length; i++) {
    console.log(arr[i]);
}

🍅for 반복문을 이용한 객체 순회

let person = {
    name: "cloudmato",
    age: 24,
    tall: 164
};

const personKeys = Object.keys(person);

for(let i = 0; i < personKeys.length; i++) {
    const curKey = personKeys[i];
    const curValue = person[curKey];

    console.log(`${curKey} : ${curValue}`);
}
  • keys, values 등을 이용하여 객체를 배열처럼 만들어 순회가 가능하다. 

배열 내장함수

🍅 forEach

const arr = [1,2,3,4];

for (let i = 0; i < 4; i++) {
    console.log(arr[i]);
}
  • 해당 코드를 줄여보자. 
const arr = [1,2,3,4];

arr.forEach((elm) => console.log(elm));
  • 배열의 모든 요소를 한 번씩 순회할 수 있도록 해준다. 
  • 즉, arr이라는 배열에 forEach라는 내장함수를 사용하게 되면 이 내장함수에 전달하는 콜백 함수를 각각의 요소들에 대해서 실행한다. 

🍅map

const arr = [1,2,3,4];
const newArr = [];

arr.forEach((elm) => newArr.push(elm));

console.log(newArr);    //[ 1, 2, 3, 4 ]
  • 해당 코드를 줄여보자
const arr = [1,2,3,4];
const newArr = arr.map((elm) => {
    return elm * 2;
});

console.log(newArr);    //[ 2, 4, 6, 8 ]
  • map은 원본 배열의 모든 요소를 순회하면서 리턴된 값을 따로 배열로 반환한다. 

🍅 includes

const arr = [1,2,3,4];

console.log(arr.includes(1));   //true
console.log(arr.includes(8));   //false

🍅indexOf

const arr = [1,2,3,4];

console.log(arr.indexOf(3));     //2
console.log(arr.indexOf(10));    //-1 존재하지 않는 값
  • indexOf는 주어진 인자에 일치하는 인덱스를 반환하는 내장함수이다. 

🍅findIndex

const arr = [
    { color: "red"},
    { color: "black"},
    { color: "blue"},
    { color: "green"}
];

console.log(arr.findIndex((elm) => elm.color === "black")); //1
  • findIndex 메서드를 이용하면 콜백 함수를 전달해서 해당 콜백 함수가 true를 반환하는 첫 번째 요소를 반환한다. 

🍅filter

const arr = [
    { num: 1, color: "red"},
    { num: 2, color: "black"},
    { num: 3, color: "blue"},
    { num: 4, color: "green"}
];

console.log(arr.filter((elm) => elm.color === "blue"));
  • filter메서드는 배열에서 어떤 특정한 조건을 만족하는 요소들을 배열로 다시 반환받을 수 있도록 해준다. 

🍅slice

const arr = [
    { num: 1, color: "red"},
    { num: 2, color: "black"},
    { num: 3, color: "blue"},
    { num: 4, color: "green"}
];

console.log(arr.slice());       //배열 그대로 반환
console.log(arr.slice(1,2));    //[ { num: 2, color: 'black' } ]
  • slice메서드는 begin인덱스부터 end-1번째 인덱스까지 잘라 배열로 반환한다. 
  • 즉 begin번째 인덱스에 해당하는 요소는 반환되지 않는다. 

🍅concat

const arr = [
    { num: 1, color: "red"},
    { num: 2, color: "black"},
];

const arr1 = [
    { num: 3, color: "blue"},
    { num: 4, color: "green"}
]

console.log(arr.concat(arr1));

// [
//     { num: 1, color: 'red' },
//     { num: 2, color: 'black' },
//     { num: 3, color: 'blue' },
//     { num: 4, color: 'green' }
// ]
  • concat 메서드를 사용하면 서로 다른 배열을 붙일 수 있다. 

🍅sort

let chars = ["나", "다", "가"];

chars.sort();

console.log(chars); //[ '가', '나', '다' ]
  • sort 메서드는 원본 배열을 정렬해준다. 
let numbers = [3, 20, 1, 2, 2, 4];

numbers.sort();

console.log(numbers);   //[ 1, 2, 2, 20, 3, 4 ]
  • 하지만 sort메서드는 사전순으로 정렬을 해주기 때문에 숫자 배열 정렬을 시도하면 이런 결과가 나온다. 
let numbers = [3, 20, 1, 2, 2, 4];

const compare = (a,b) => {
    if(a > b) {
        return 1;
    }
    
    if(a < b) {
        return -1;
    }

    return 0;
}

numbers.sort(compare);
console.log(numbers);   //[ 1, 2, 2, 3, 4, 20 ]

🍅join

const arr = ["cloud", "mato"];

console.log(arr);               //[ 'cloud', 'mato' ]
console.log(arr.join());        //cloud,mato
console.log(arr.join(" "));     //cloud mato
console.log(arr.join("바보"));     //cloud바보mato


+ Recent posts